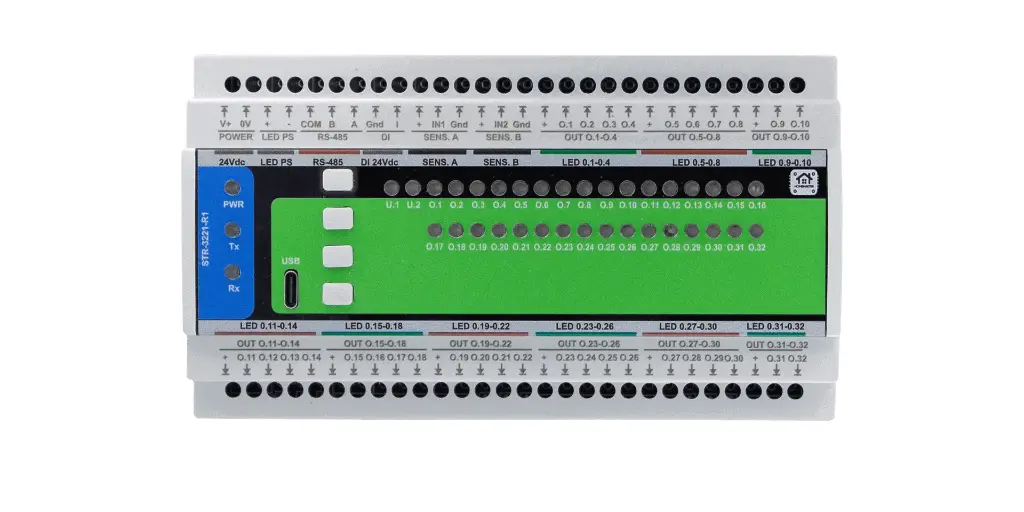
32-channel output module for Home Assistant: stair lighting and underfloor heating zones
The HomeMaster STR-3221-R1 is a DIN-rail 32-channel output module for a wired smart home running Home Assistant. Thirty-two low-side MOSFET channels, rated 1.5 A each and 18 A across the module, switch one 12 or 24 V DC LED step — or one thermoelectric actuator — per channel. It is a Modbus RTU slave on RS-485, so an ESPHome controller exposes the whole staircase or manifold to Home Assistant over one twisted pair.
The stair sequence and the heating-zone cycle run on the module. They keep working with the controller switched off and the bus unplugged. Zone temperatures do not: setpoints still come from Home Assistant. The module does not measure rooms and does not regulate them.
Each channel is rated 1.5 A and the module path 18 A in total on the external 12–24 V DC field supply. Before wiring a manifold, compare each thermoelectric actuator's hold current and its initial warm-up inrush against both limits. A configurable cap limits how many heat heads may open at once.
The module holds the valves, the slow PWM (factory 15 minutes), the first-open delay, the demand flag, valve exercise and frost protection. The controller holds temperature, the pump and boiler relays, and the schedule. If the controller goes quiet, each lighting channel does what you set — hold, switch off, or go to a preset level. Heating channels enter frost protection after the hours you configured. Failsafe ships switched off.
Thirty-two individually switched steps in nine DIN modules is the point. The usual alternative is one channel for the entire flight, which turns a staircase into a single on-off light, or a rack of relay boards and a custom script on the controller. Here the channels are nine groups, each with its own + rail: top row 4+4+2, bottom row 4+4+4+4+4+2, and the field terminals carry the 18 A module path.
The same thirty-two channels are useful well beyond a staircase. As a general-purpose DIN-rail MOSFET output module they drive cabinet and plinth lighting, corridor and skirting runs, small 12–24 V solenoids and indicator loads — anything low-voltage that needs a lot of separately switched outputs on one Modbus address instead of a wall of relays.
The HomeMaster STR-3221-R1 is a high-density smart LED / I/O controller module designed for stair lighting, architectural illumination and general low-voltage automation in HomeMaster systems and other Modbus RTU networks. It features 32 low-side MOSFET outputs for 12-24 V DC LED loads, 1 IEC 61131-2 compliant 24 V DC discrete input, 2 presence-sensor inputs, 4 local buttons and 2 user-assignable status LEDs.
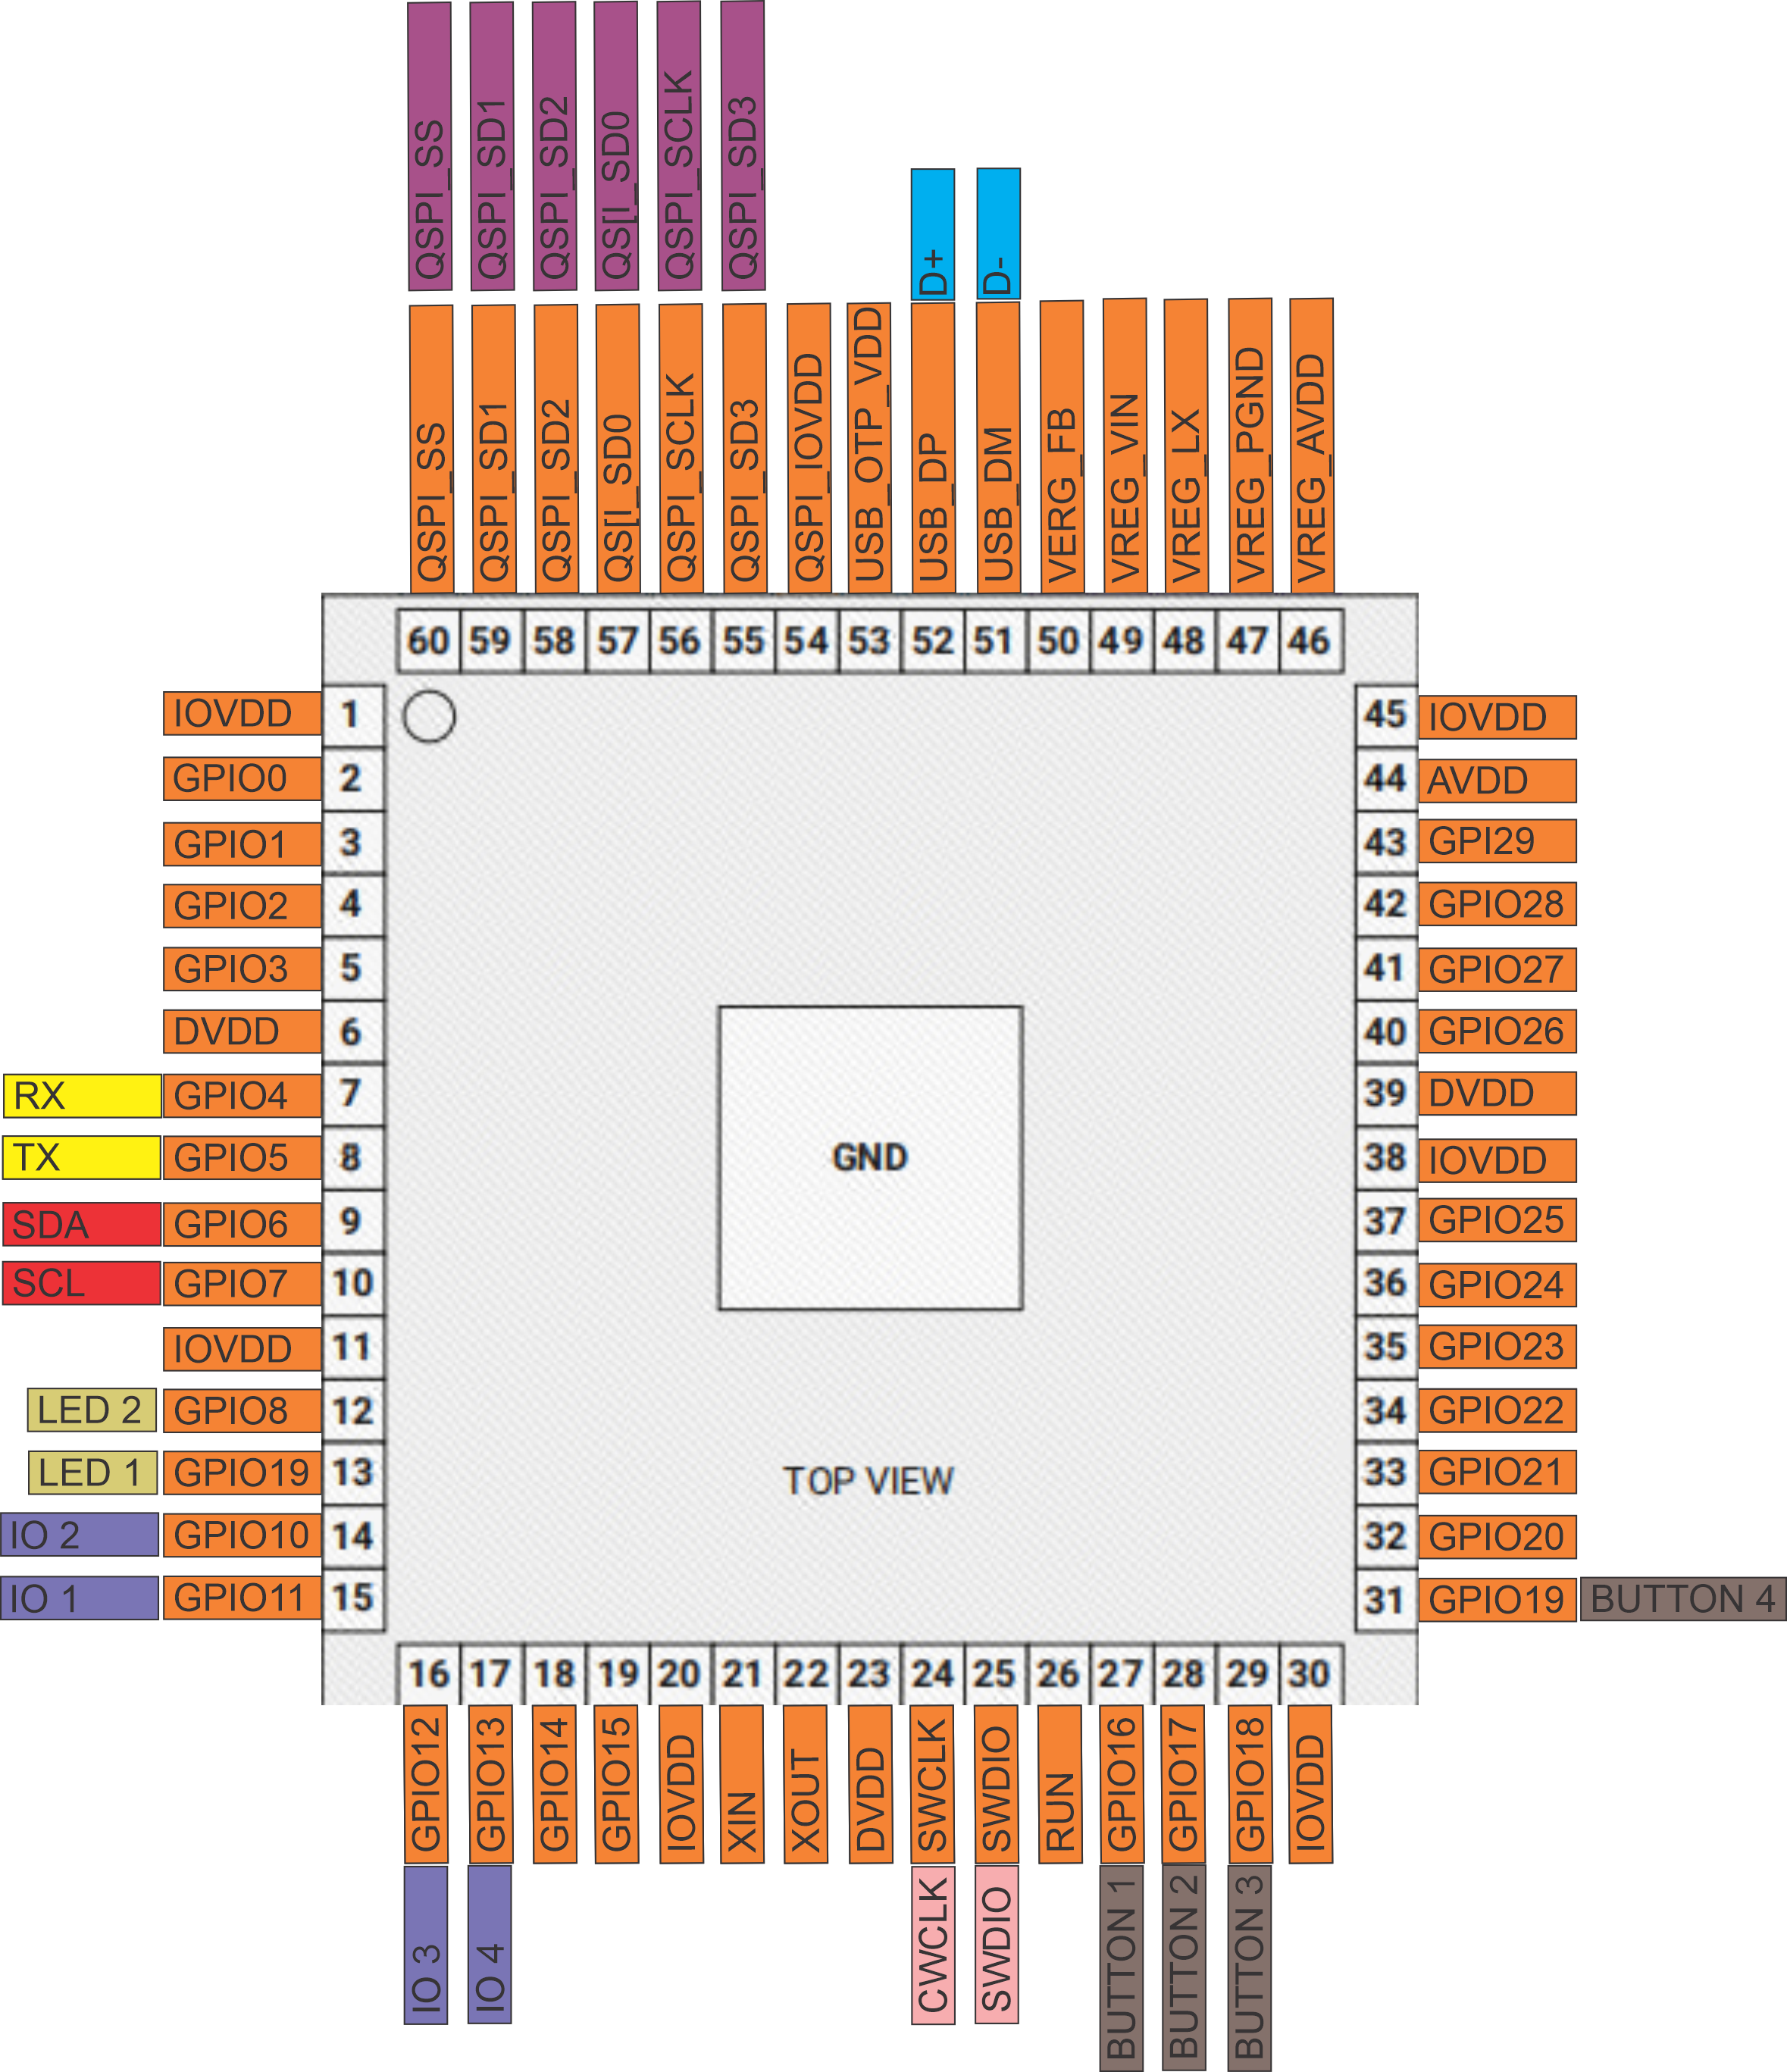
Powered by the Raspberry Pi RP2350 microcontroller, the module supports RS-485 (Modbus RTU) communication and configuration via WebConfig over USB-C - no drivers or external software required. Configuration is stored in on-device flash (LittleFS) and survives power loss and reboots. It connects directly to HomeMaster MicroPLC and MiniPLC controllers or operates as a standalone Modbus slave in any automation network.
Through a MiniPLC or MicroPLC running ESPHome, the module appears in Home Assistant over the native ESPHome API — no MQTT broker, no Modbus register mapping in Home Assistant and no custom converters. Entities are ready to use within seconds, with low latency and no cloud.
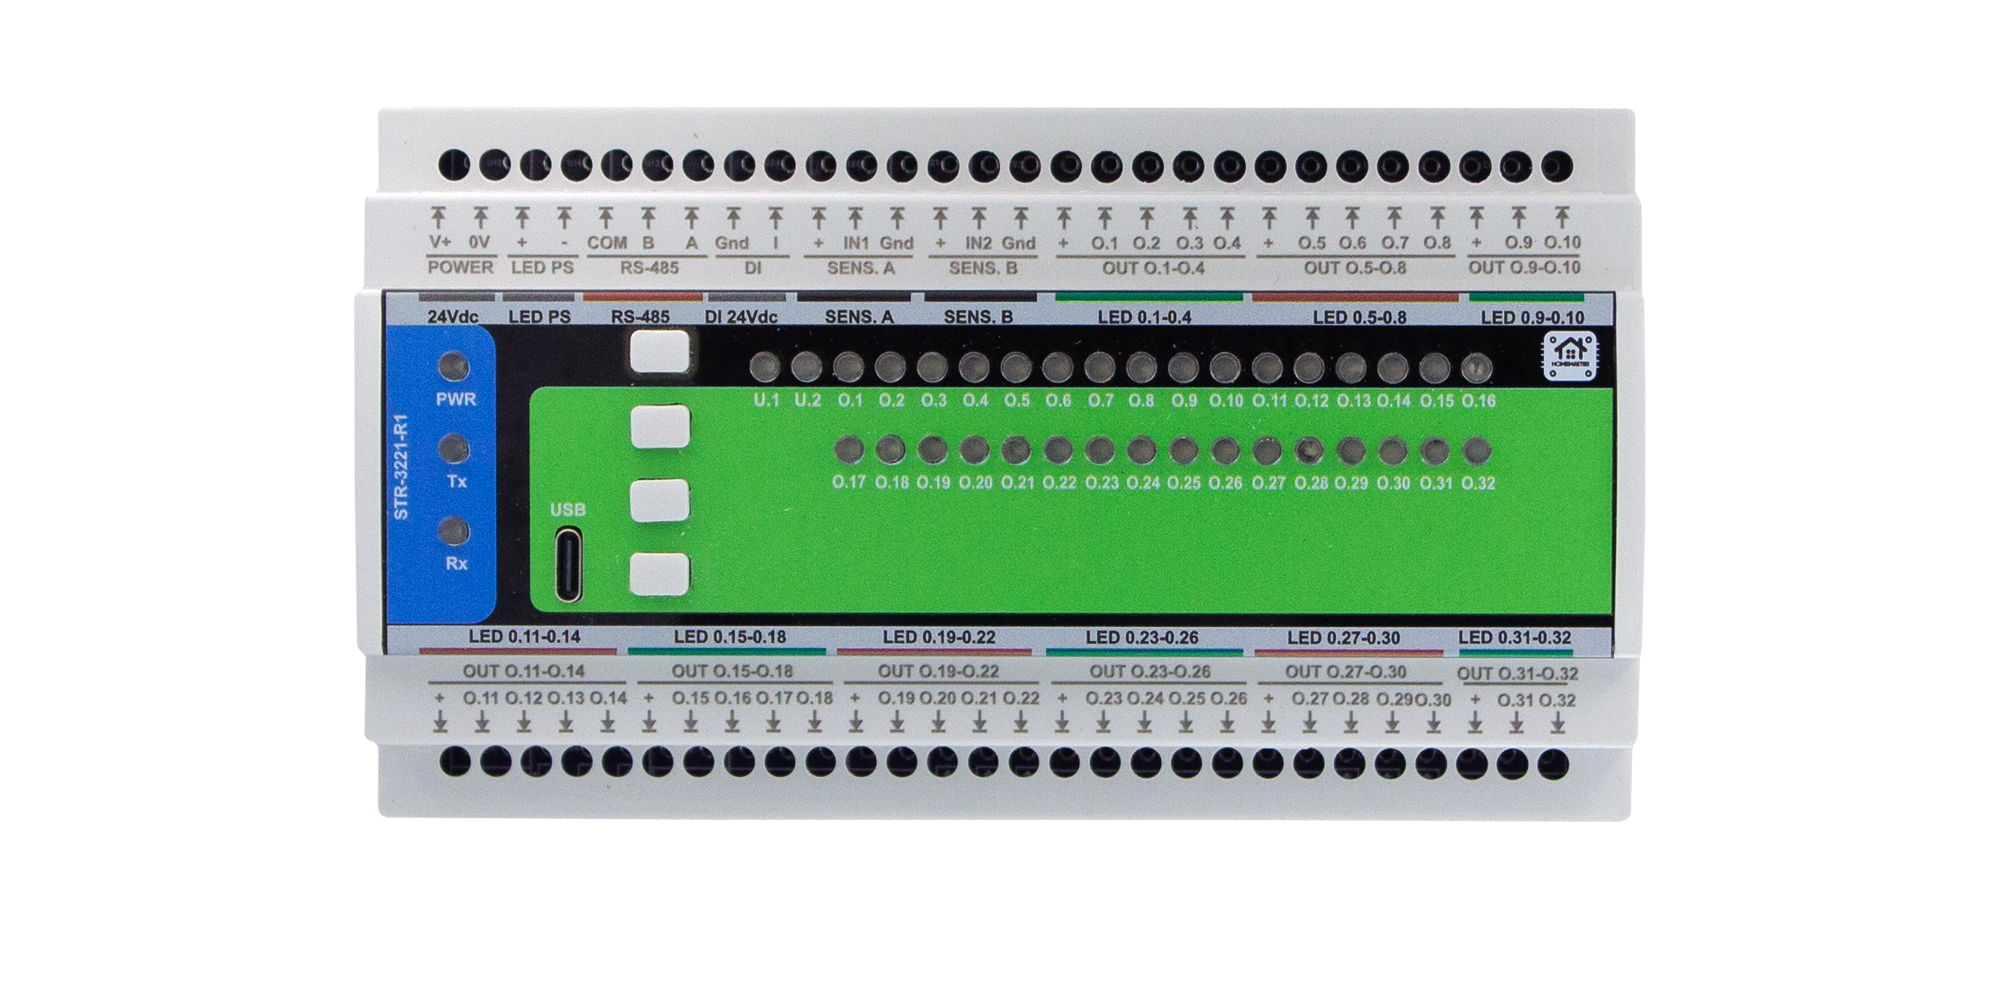
Quick Overview
- 32 heating zones, or 32 stair steps, on one DIN module
- The stair sequence lives on the module and survives Home Assistant going down
- 32 low-side MOSFET outputs (12-24 V DC), independently dimmable 0-255, 1 IEC 61131-2 DI + 2 presence-sensor inputs, 4 buttons, 2 status LEDs
- Up to 32 underfloor heating zones with 24 V DC thermoelectric actuators
- Open Modbus RTU bus — any master, not one ecosystem
- Local buttons and inputs act on the outputs with no controller present
- Local configuration via USB-C WebConfig interface
- Configurable bus failsafe; ships disabled
Typical Applications
- Stair LED lighting with motion sensors
- Underfloor heating manifold control, up to 32 zones
- Multi-manifold heating installations from one module
- Architectural and ambient lighting
- Multi-channel low-voltage LED control
- Scene control from wall switches, buttons or Home Assistant
- Status indicators and alarm signaling
- Building and home automation
- PLC lighting expansion module
- Industrial signal lamps and indicators
Tech Specs
| Specification | Details |
|---|---|
| Microcontroller | RP2350A dual-core microcontroller |
| Storage | External QSPI Flash (32 Mbit) |
| Power Input | 24 V DC nominal |
| Input Protection | 1 A fuse (F8), TVS surge suppression, EMI filtering |
| Main Logic Supply | Buck regulator 24 V → 5 V (~4.96 V nominal), 3.3 V LDO regulator |
| LEDs supply input | External 12–24 V DC (independent from logic supply) |
| Document revision | DS-STR-3221-R1 Rev. B · 2026-09 · Hardware R1 (V1.0) |
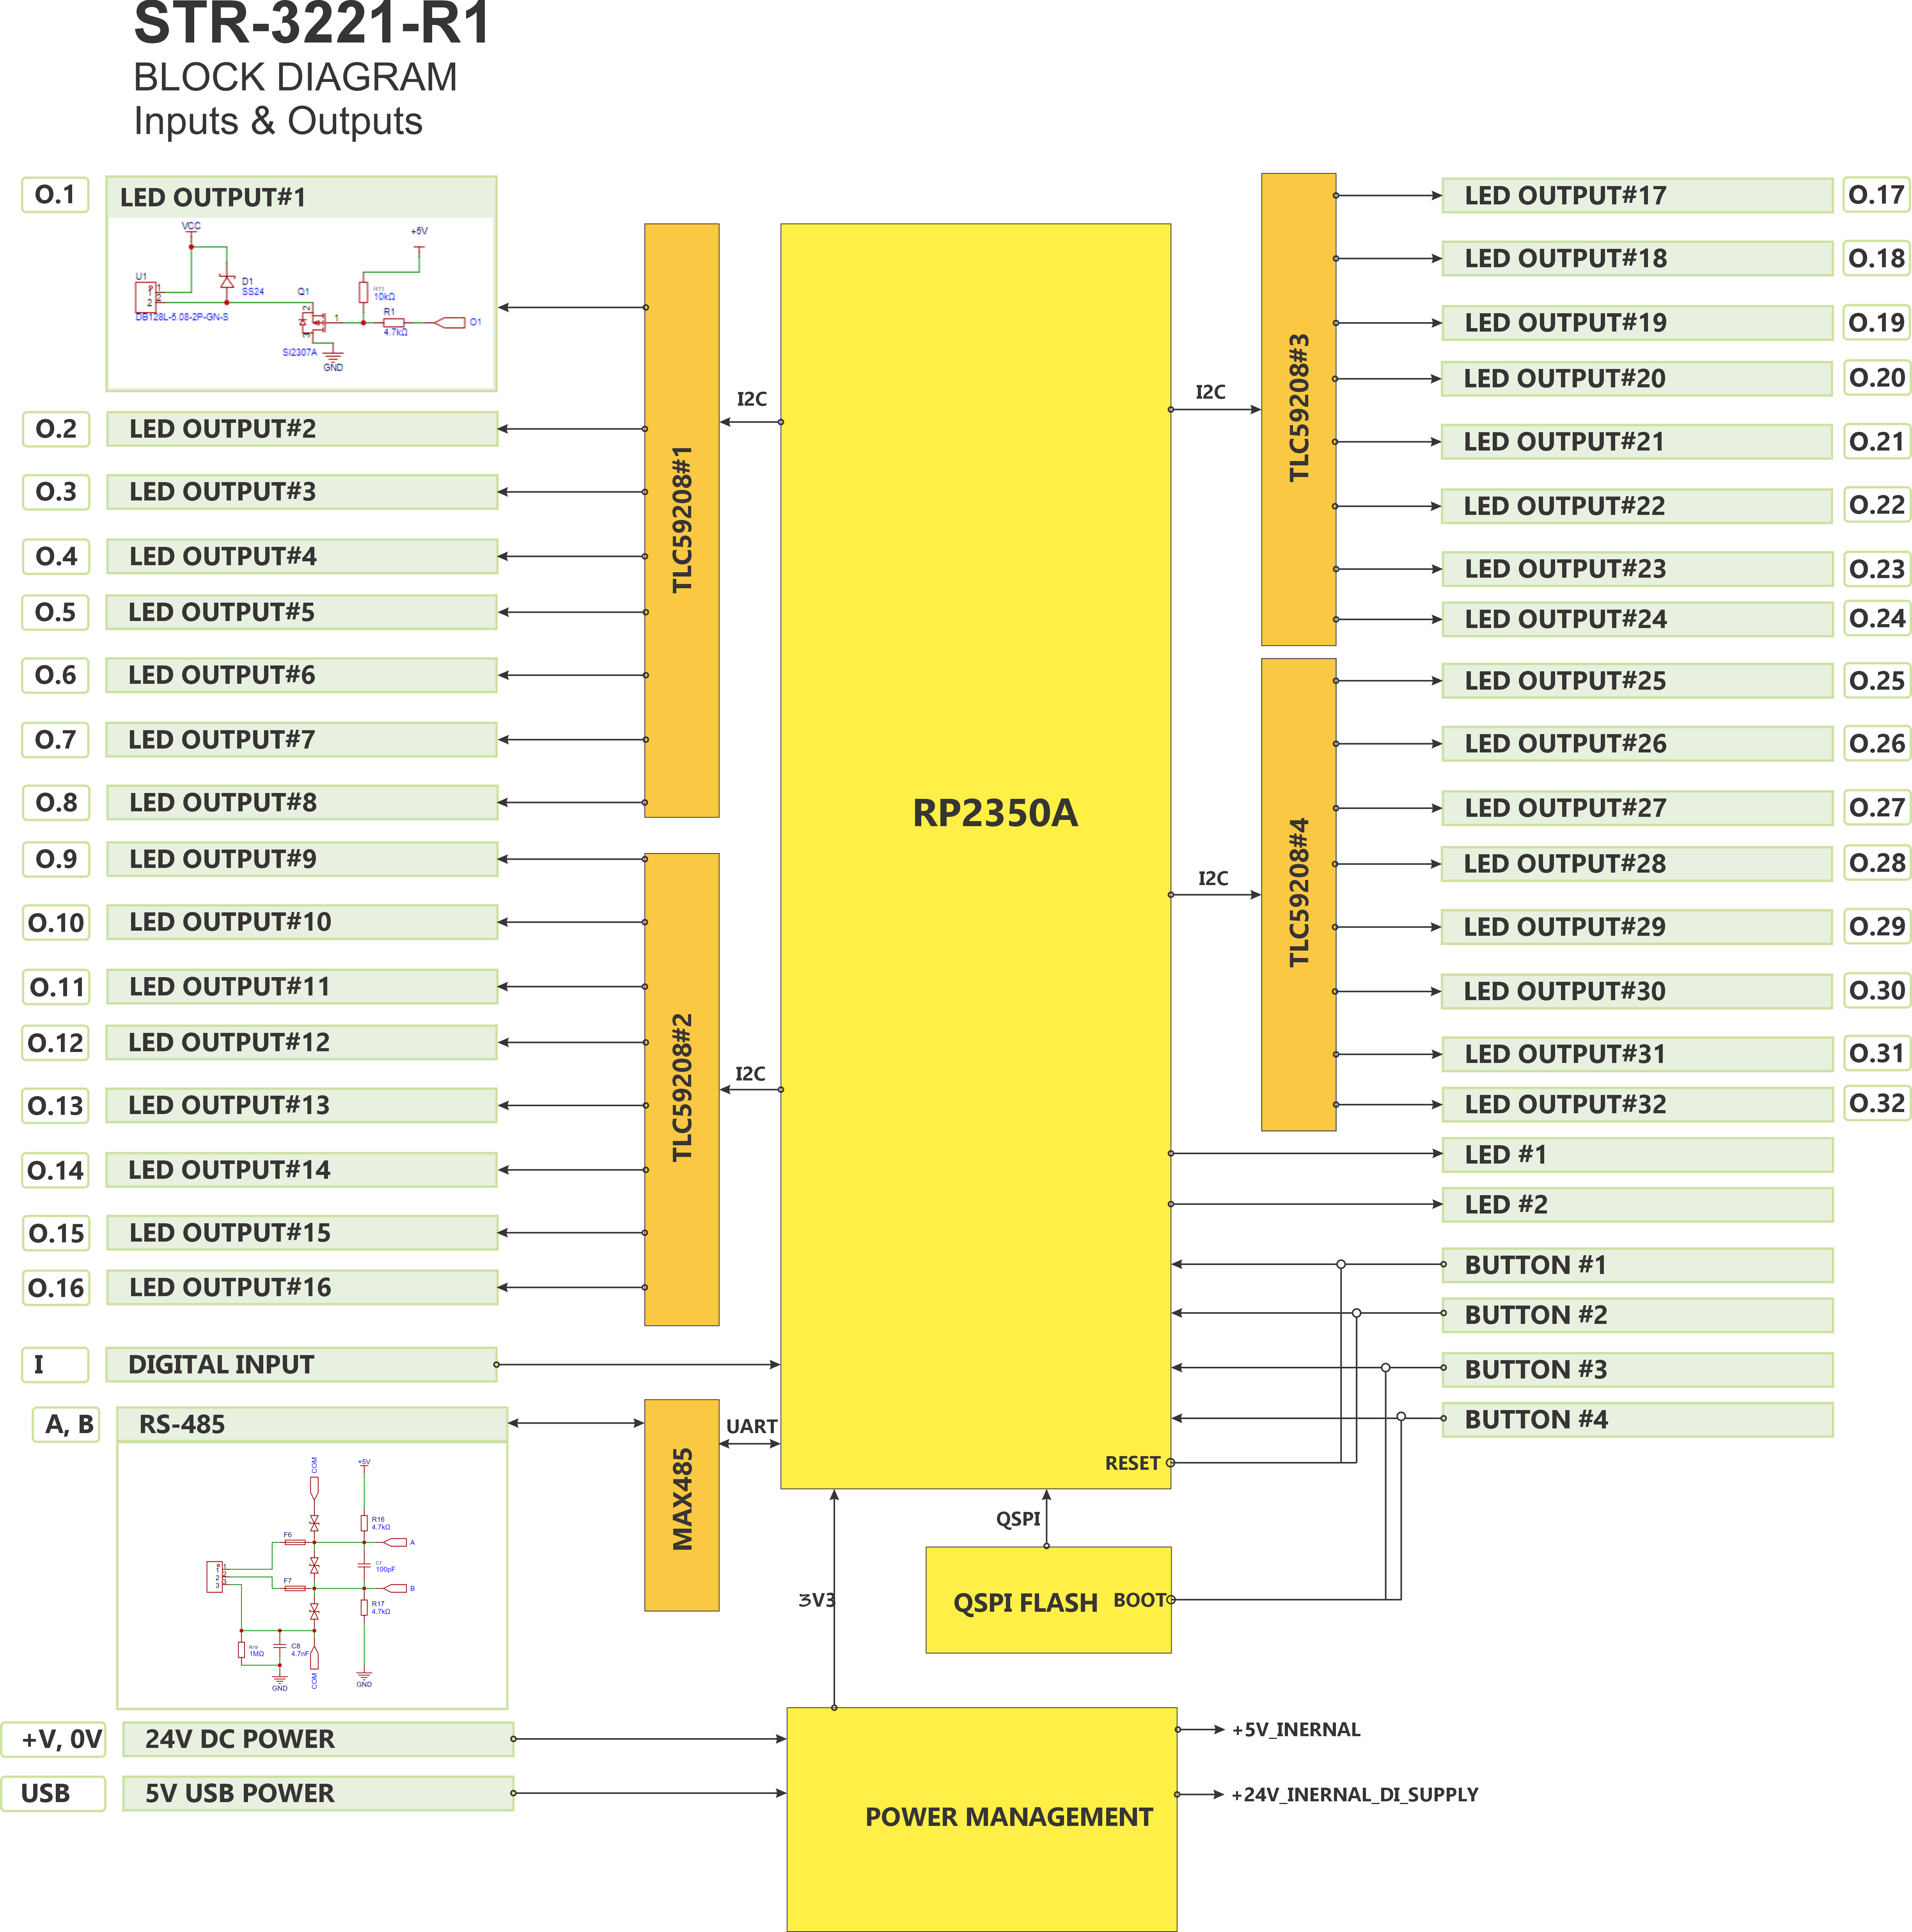
| LED Outputs | 32 × low-side MOSFET outputs (O1–O32), driven by 4 × TLC59208F (8 channels per chip). The TLC chips drive the main outputs, not the status LEDs. |
| LED Output Voltage | External 12–24 V DC supply |
| Maximum Total LED Current | 18 A per module, shared across all channels in use |
| Maximum current per channel | 1.5 A per channel |
| Output Structure | Open-drain, grouped by VCC rails, each channel with gate resistor + RC + ferrite |
| Digital Inputs | 1 × module-wetted dry-contact input (ISO1212 input receiver, supplied from the module; not isolated) |
| Isolation | None — DI, IN1/IN2, outputs and RS-485 all share the module ground |
| Presence sensor inputs (SENS.A / SENS.B) | 2 × presence inputs IN1 / IN2 (SFH6156), supplied from the module's SENS.A / SENS.B +5 V rails; not isolated |
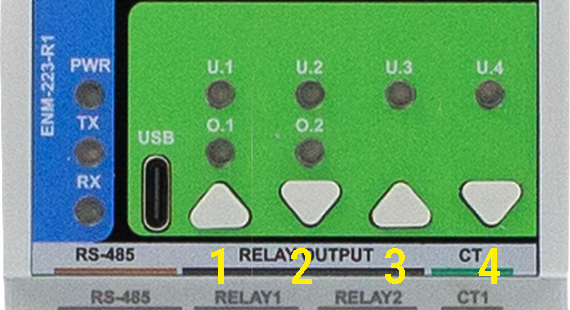
| User Interface | 4 buttons; 2 assignable status LEDs; power, RX and TX indicators; 32 channel-state indicators |
| Local control | Buttons SW1–SW4 and the three inputs act on the outputs; a local action holds priority until released. |
| Bus failsafe | Per-channel Hold / Off / Level on loss of the master; timeout 0 = off. Heat uses frost protection instead. |
| Sequencing | Stair sequence and heating-zone cycle run on the module. |
| Heating demand | Aggregate demand flag and open-zone count for the controller’s pump / boiler relay. |
| RS-485 | Half-duplex Modbus RTU, not galvanically isolated; surge protection and fail-safe biasing. Factory default address 3, 19200 baud, 8N1. |
| USB | USB-C, 5 V logic, ESD protected |
| Modbus defaults | Address 3, 19200 baud, 8N1 |
| Typical Power Consumption | 0.2–0.5 W |
Note: Outputs are not internally fused per channel. Use external overcurrent protection on the LED supply rails per applicable standards and installation requirements.
Installation, Environmental & Mechanical
| Category | Specification | Details |
|---|---|---|
| Operating temperature | 0 °C to +40 °C | |
| Storage temperature | −10 °C to +55 °C | |
| Relative humidity | 0–90 % RH, non-condensing | |
| Ingress protection | IP20 (inside cabinet only) | |
| Installation | Indoor control cabinet only; not for outdoor or exposed installation | |
| Maximum altitude | 2000 m | |
| Pollution degree | 2 | |
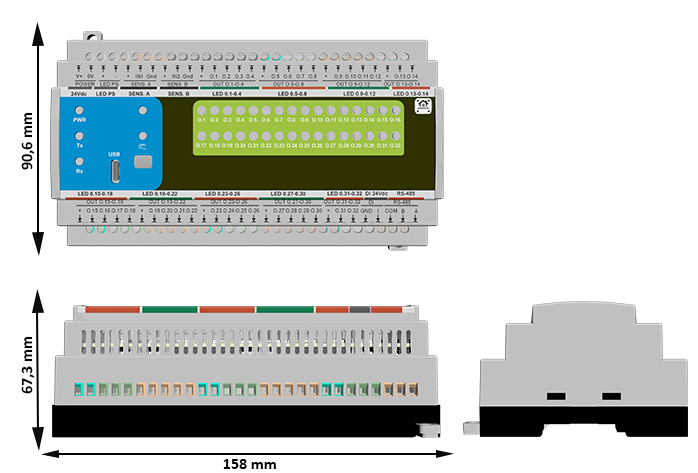
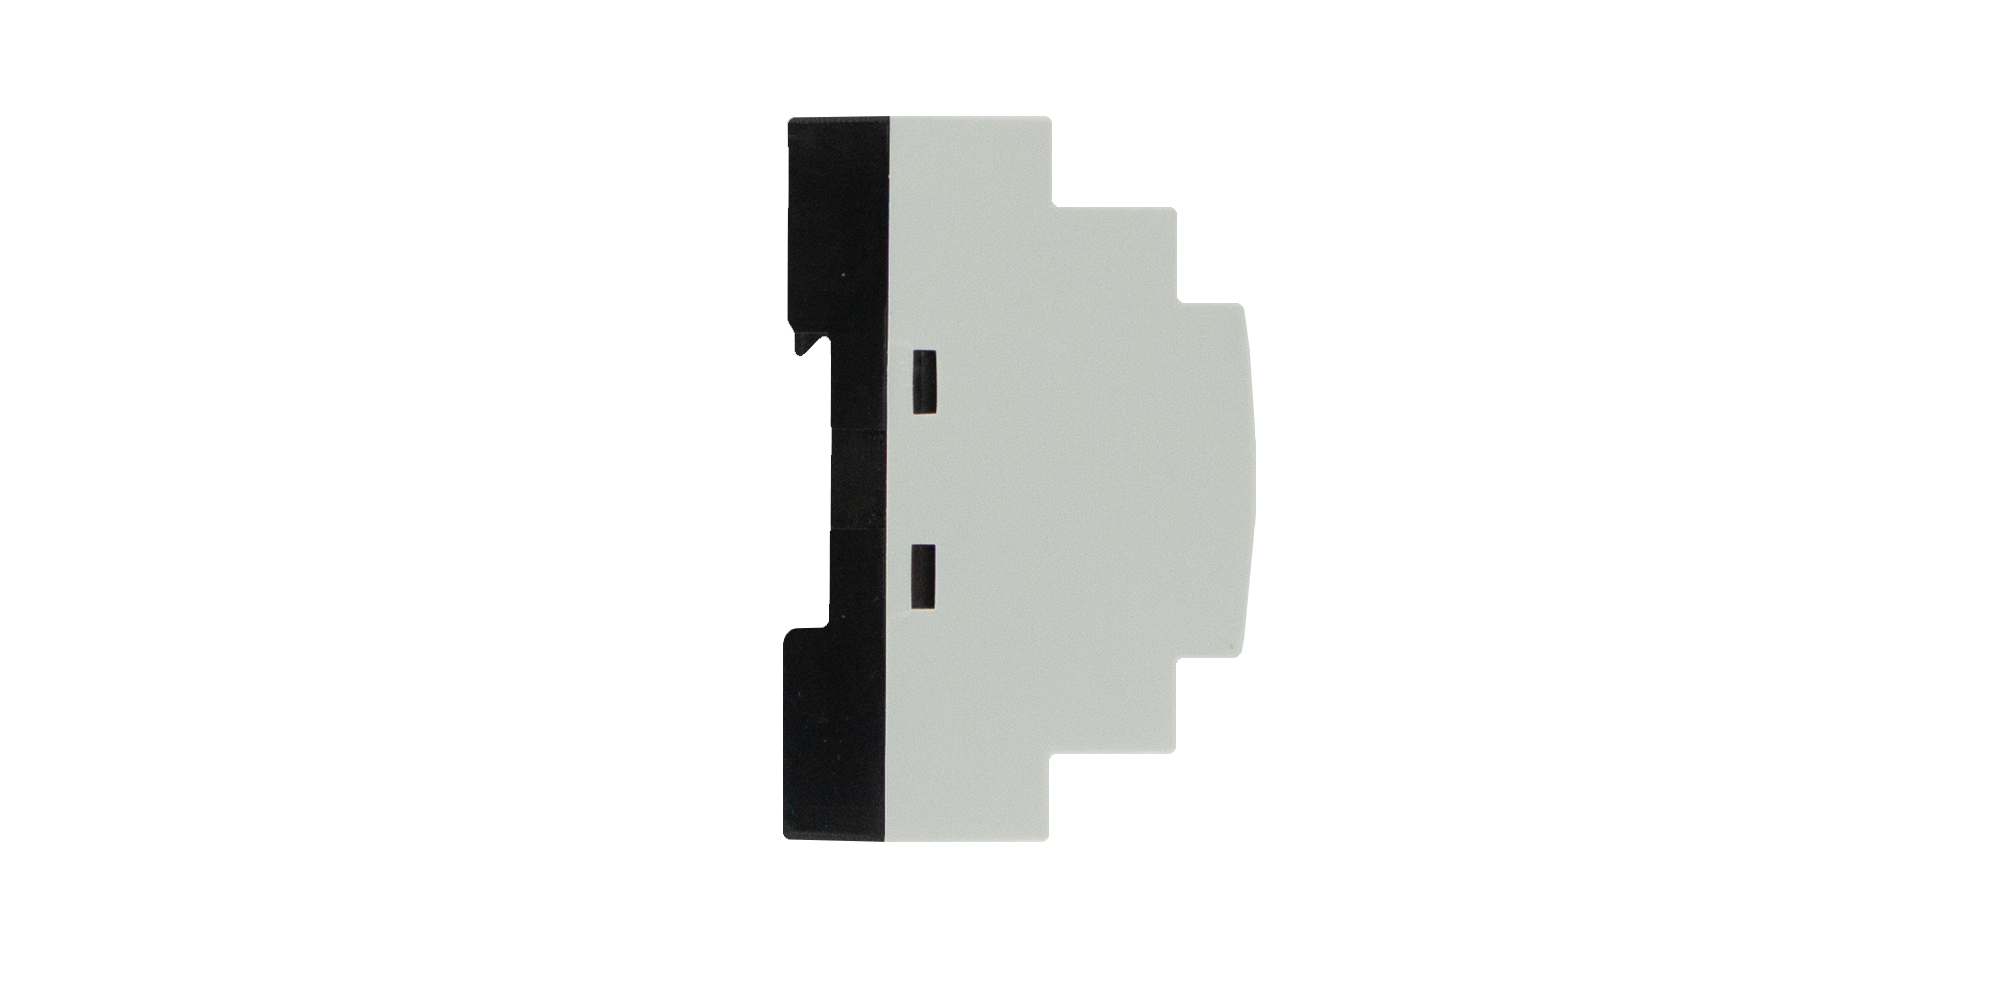
| Dimensions | 158 × 90.6 × 67.3 mm (L × W × H) | |
| DIN width | 9 modules (≈ 158 mm) | |
| Mounting | 35 mm DIN rail | |
| Enclosure | PC/ABS industrial enclosure | |
| Terminal type | Pluggable screw terminal blocks, 5.08 mm pitch | |
| Wire cross-section | 0.2–2.5 mm² (AWG 24–12) | |
| Tightening torque | 0.4–0.6 Nm | |
| Net weight | 150 g | |
| Gross weight | 248 g | |
| Pack size | 230 × 140 × 87 mm (L × W × H) |
Install only inside a control cabinet with ventilation; the cabinet must include a protective front plate covering all module connection terminals and a closing protective door; not for outdoor or exposed installation.
All wiring terminals must be protected against accidental contact by an insulating front plate, wiring duct, or terminal cover. Exposed live terminals are not permitted.
Home Assistant / Modbus / Web Config Integration
The STR-3221-R1 supports flexible integration with:
- HomeMaster MicroPLC and MiniPLC controllers
- PLC and SCADA systems via Modbus RTU
- Home Assistant using ESPHome or Modbus integration
- Direct USB-C configuration using browser-based WebConfig tool
Configuration parameters are stored persistently in onboard flash and automatically restored at power-up.
Quick Setup Process (USB-C WebConfig)
- Mount & Power - Mount the module on a DIN rail and connect 24 V DC.
- Connect USB-C - Connect USB-C cable to the module.
- Open WebConfig - Open WebConfig page in Chrome or Edge browser.
- Connect Device - Click Connect and select the device.
- Configure - Set Modbus address and baud rate.
- Test I/O - Test outputs O1-O32, status LEDs and digital inputs.
- Save & Disconnect - Save settings and disconnect USB-C.
Features:
- Driverless browser-based configuration
- Live configuration and diagnostics
- Persistent flash storage
- No external software required
WebConfig provides Modbus address, baud rate, I/O test, and channel configuration (stored persistently in flash).
Minimal ESPHome YAML (Controller side)
Use this on the MiniPLC/MicroPLC (ESPHome). It enables the RS-485 bus and imports the STR-3221-R1 package.
uart:
  id: uart_modbus
  tx_pin: 17
  rx_pin: 16
  baud_rate: 19200
  parity: NONE
  stop_bits: 1

modbus:
  id: modbus_bus
  uart_id: uart_modbus
  turnaround_time: 100ms
  send_wait_time: 250ms

packages:
  str1:
    url: https://github.com/isystemsautomation/homemaster-dev
    ref: main
    files:
      - path: STR-3221-R1/Firmware/v0.2.0/default_str_3221_r1_plc/default_str_3221_r1_plc.yaml
        vars:
          str_prefix: "STR#1"
          str_id: str_1
          str_address: 3
    refresh: 1d
ESPHome 2026.7.0 raised the Modbus client defaults —
turnaround_timefrom 100 ms to 600 ms andsend_wait_timefrom 250 ms to 2000 ms (PR #11969).At the 600 ms default the bus carries only about 1.5 Modbus transactions per second, whatever the UART speed, because the controller stays silent for 600 ms after every response. Two modules on one RS-485 bus become slow to respond. With three or more, one module can stop being polled altogether — with no timeout and no CRC error in the log.
On ESPHome 2026.7.0 and newer, set both values explicitly as shown above. On earlier releases these were the defaults and the two lines are not required.
str_address must match the Modbus address configured in WebConfig.
Full Modbus register map and integration details are in the STR-3221-R1 README.
The module needs a Modbus master on the bus. In a HomeMaster system that is the MiniPLC or the MicroPLC — both run ESPHome and connect to Home Assistant over the native API. To work out how many modules a panel needs and how wide it comes out, use the System Builder.
Field devices stay your choice: thermoelectric actuators on the group rails, room sensors already in Home Assistant, and pumps or mixing valves on other modules on the same RS-485 bus.
New to this kind of system? Two guides cover the ground: building a Home Assistant automation system and a wired ESPHome smart home.
Going deeper on this module: lighting every stair step individually and what still works when Home Assistant is down. Related modules for hydronic heating: AIO-422-R1, DIO-430-R1 and the OpenTherm Gateway.
Frequently asked questions
How does it get into Home Assistant?
Through a Modbus master on the RS-485 bus. In a HomeMaster system that is the MiniPLC or the MicroPLC running ESPHome; the channels and the presence inputs then appear in Home Assistant over the native ESPHome API. No MQTT broker and no hand-written Modbus register map.
What do I connect to each channel?
One LED step per channel, on a 12 or 24 V DC supply that is separate from the module's own 24 V power. The outputs are low-side switches: the step's positive goes to its group rail, its negative to the channel terminal. Each channel is rated 1.5 A and the module path 18 A in total, so a full staircase of typical LED strip segments sits well inside the budget.
Can it drive underfloor heating actuators?
Yes — 24 V DC thermoelectric heads, one per loop, wired like an LED load: head + to the group rail, head − to the channel terminal. The per-channel limit is 1.5 A and the module path 18 A in total. Slow PWM, phase spread, a simultaneous-open cap, first-open delay, valve exercise and frost protection run on the module. Temperature, schedule and the pump/boiler relays stay on the controller. NC and NO heads are set per channel.
How does it know which way someone is walking?
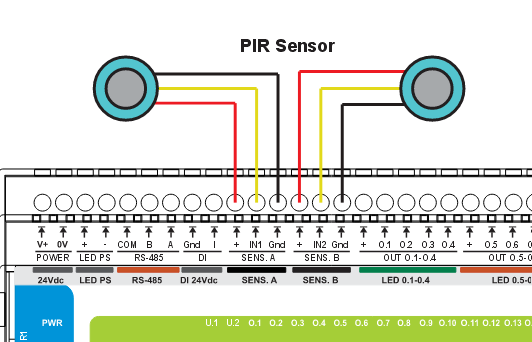
Two presence-sensor inputs, IN1 and IN2, one at each end of the flight, each with a fused +5 V auxiliary rail to power the sensor — check the sensor is rated for a 5 V supply. The first edge starts the sequence; which input fired first sets the direction, on the module, with no controller. There is also one IEC 61131-2 compliant 24 V digital input with an ISO1212 input receiver (module-wetted, not galvanically isolated) for a wall button or a contact from elsewhere in the system.
Can I use fewer than 32 steps?
Yes — leave the unused channels unconnected. Nothing has to be populated, and a twelve-step flight simply uses twelve channels. The remaining outputs stay available for cabinet lighting, a skirting run or anything else low-voltage on the same module.
Where is the configuration stored?
On the module. Modbus address and baud rate, channel configuration, input, LED and button behaviour are set over USB-C in WebConfig and written to on-device flash (LittleFS), so they survive a power cut and do not have to be pushed again from the controller after a restart.
Do I have to use HomeMaster controllers?
No. The module is a standard Modbus RTU slave on RS-485, address 1–247 (default 3) and baud 9600–115200 (default 19200). Any Modbus master reaches it: a third-party PLC, a SCADA system, or your own ESP32 with an RS-485 transceiver.
How is it configured?
Over USB-C from a browser using WebConfig — Web Serial, no driver and no vendor application. Modbus address and baud rate, channel configuration, input, LED and button behaviour are set there, and outputs O1–O32 can be tested one at a time from the same page before anything is wired into the automation.
What is isolated and what is not?
Nothing on the field side is isolated. The IEC 61131-2 digital input uses an ISO1212 receiver whose field side is supplied from the module (module-wetted). IN1 / IN2 use SFH6156 opto-coupled receivers supplied from the module SENS +5 V rails. The RS-485 port is not isolated — the transceiver shares the device's logic ground — and neither are the outputs O1–O32, which are low-side switches referenced to field ground. On the bus what is present is transient protection: TVS diodes, resettable PTC fuses and fail-safe biasing. Run COM to every node, and fit an external RS-485 isolator where the bus crosses into a separate electrical installation.
What still works if Home Assistant is down?
The stair sequence runs to completion from the two presence inputs. Heating zones keep their slow-PWM cycle; after the hours you configured without a poll they enter frost protection. Each lighting channel does what you set for bus loss — hold, off, or a preset level. The front-panel buttons still work: out of the box SW1 turns every lighting channel on and SW2 turns them all off.
Does the module regulate room temperature?
No. It holds valves and safety. Temperature, schedule and the pump/boiler relays stay on the controller.
Why is the MicroPLC a poor pump relay?
It exposes C and NC only. The contact is closed when the relay is off. That keeps a pump able to run if the controller dies — which is safe hydraulically and the opposite of a conventional NO demand contact. For a demand that closes when the relay is on, use a MiniPLC or an external relay.
Documentation
The STR-3221-R1 is open-source hardware. Hardware and firmware files are available.
Hardware Documentation
| File | Description | Link |
|---|---|---|
| Field board schematic | STR-3221-R1 field I/O / power stage | STR-3221-R1-FieldBoard.pdf |
| MCU board schematic | STR-3221-R1 controller / MCU board | STR-3221-R1-MCUBoard.pdf |
| Datasheet | Module specifications and electrical characteristics | Download datasheet (PDF) |
Compliance Documents
| File | Description | Link |
|---|---|---|
| EU Declaration of Conformity (DoC) | Signed EU Declaration of Conformity per Reg. (EC) 765/2008 and Decision 768/2008/EC | DoC_STR-3221-R1.pdf |
| Datasheet | Technical specifications and electrical characteristics | STR-3221-R1_Datasheet.pdf |
Firmware & Software
| Resource | Description | Link |
|---|---|---|
| Firmware Source Code | Firmware and configuration tools | GitHub repository |
| Integration Guide | Setup and configuration documentation | README.md |
| WebConfig Tool | Browser-based configuration interface | Built-in USB interface |
Cabling and Wirings
Power Supply
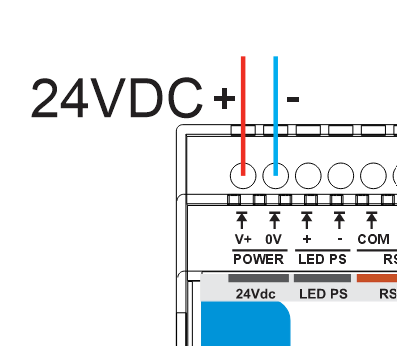
Module power (V+ / 0V): The STR-3221-R1 logic and communication operate from 24 V DC SELV/PELV only. Connect +24 V and 0 V (GND) to the terminals marked V+ and 0V.
LED power (LED PS + / -): The LED supply terminals accept 12 V or 24 V DC. Use a separate supply for the LED loads; outputs are low-side switching and require a common LED supply rail to the + group pins.
| Parameter | Specification |
|---|---|
| Module (V+ / 0V) | 24 V DC nominal - logic and module only |
| LED supply (+ / -) | 12 V or 24 V DC - for LED loads; separate from module power |
| Sensor rails (SENS.A / SENS.B) | +5 V DC fused auxiliary rails for low-power presence sensors |
| Protection | PTC fuses, reverse polarity diode, TVS suppression |
| Ground reference | Field return GND_FUSED; do not bridge to logic GND externally |
Terminal Block Layout
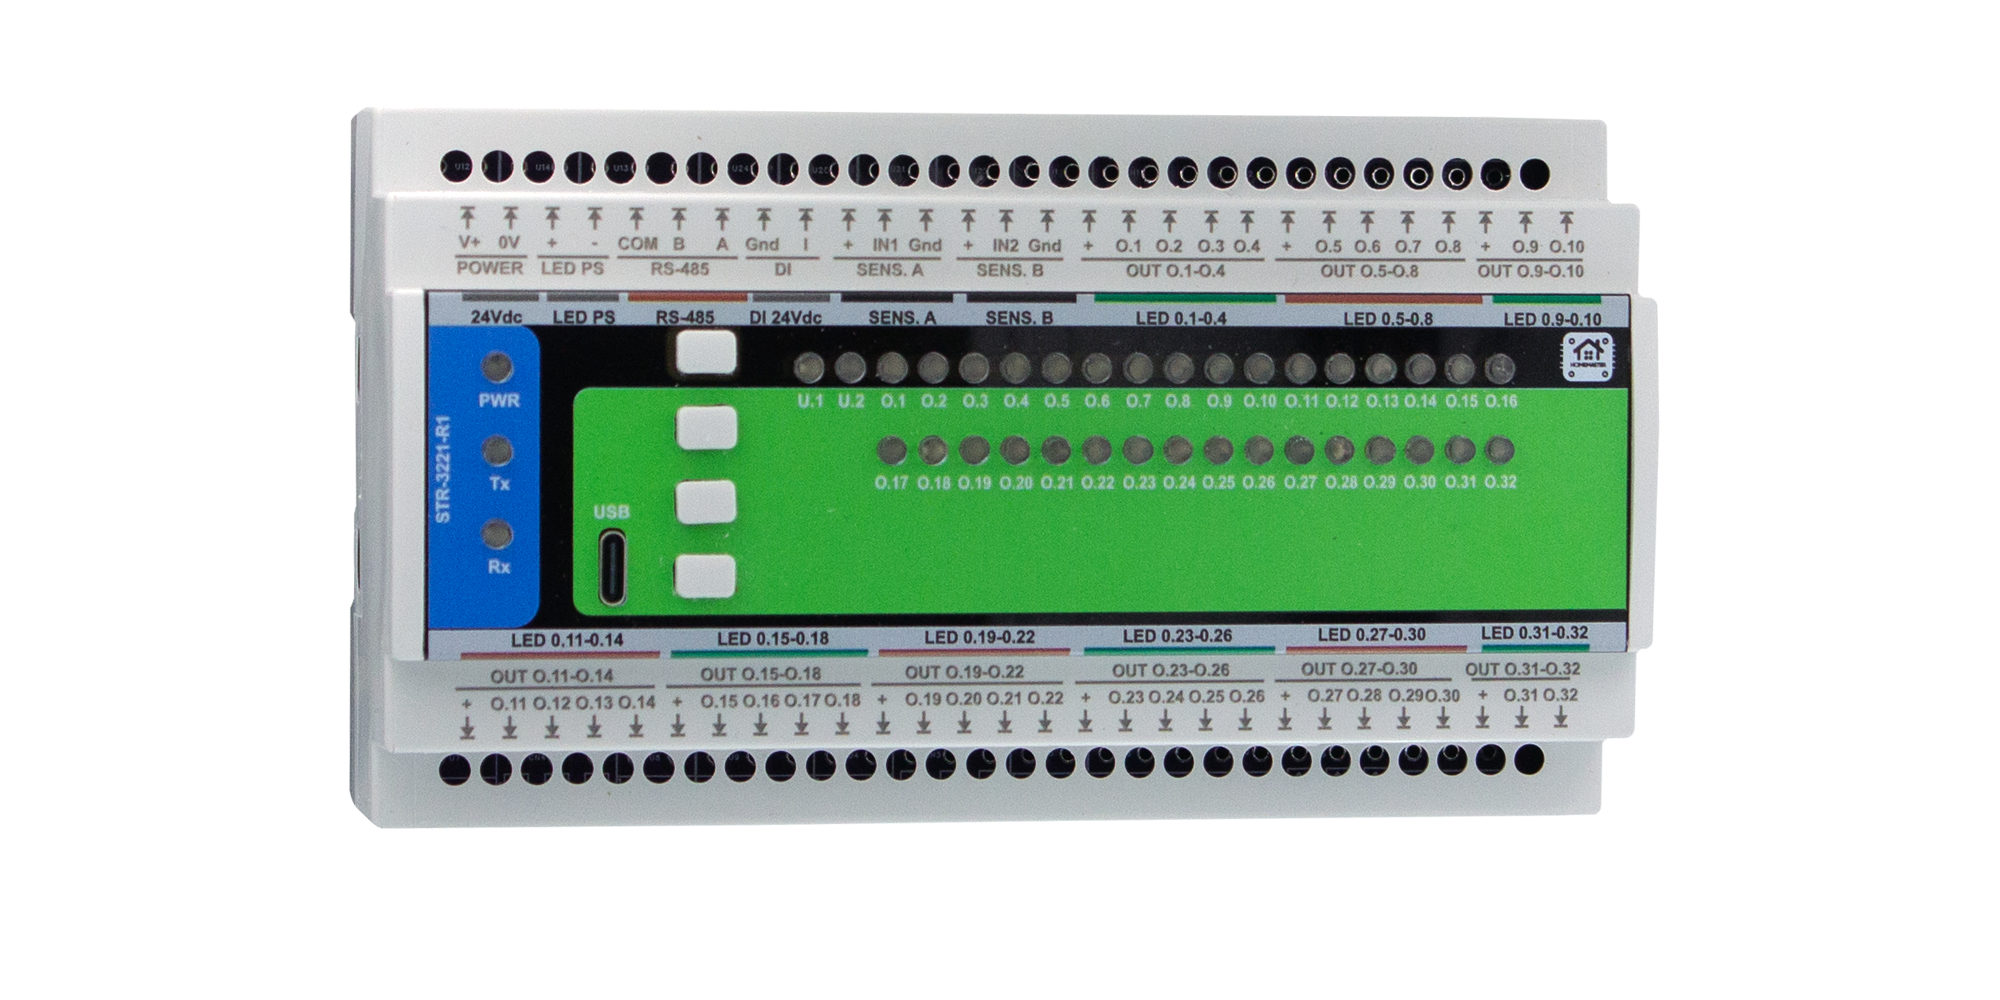
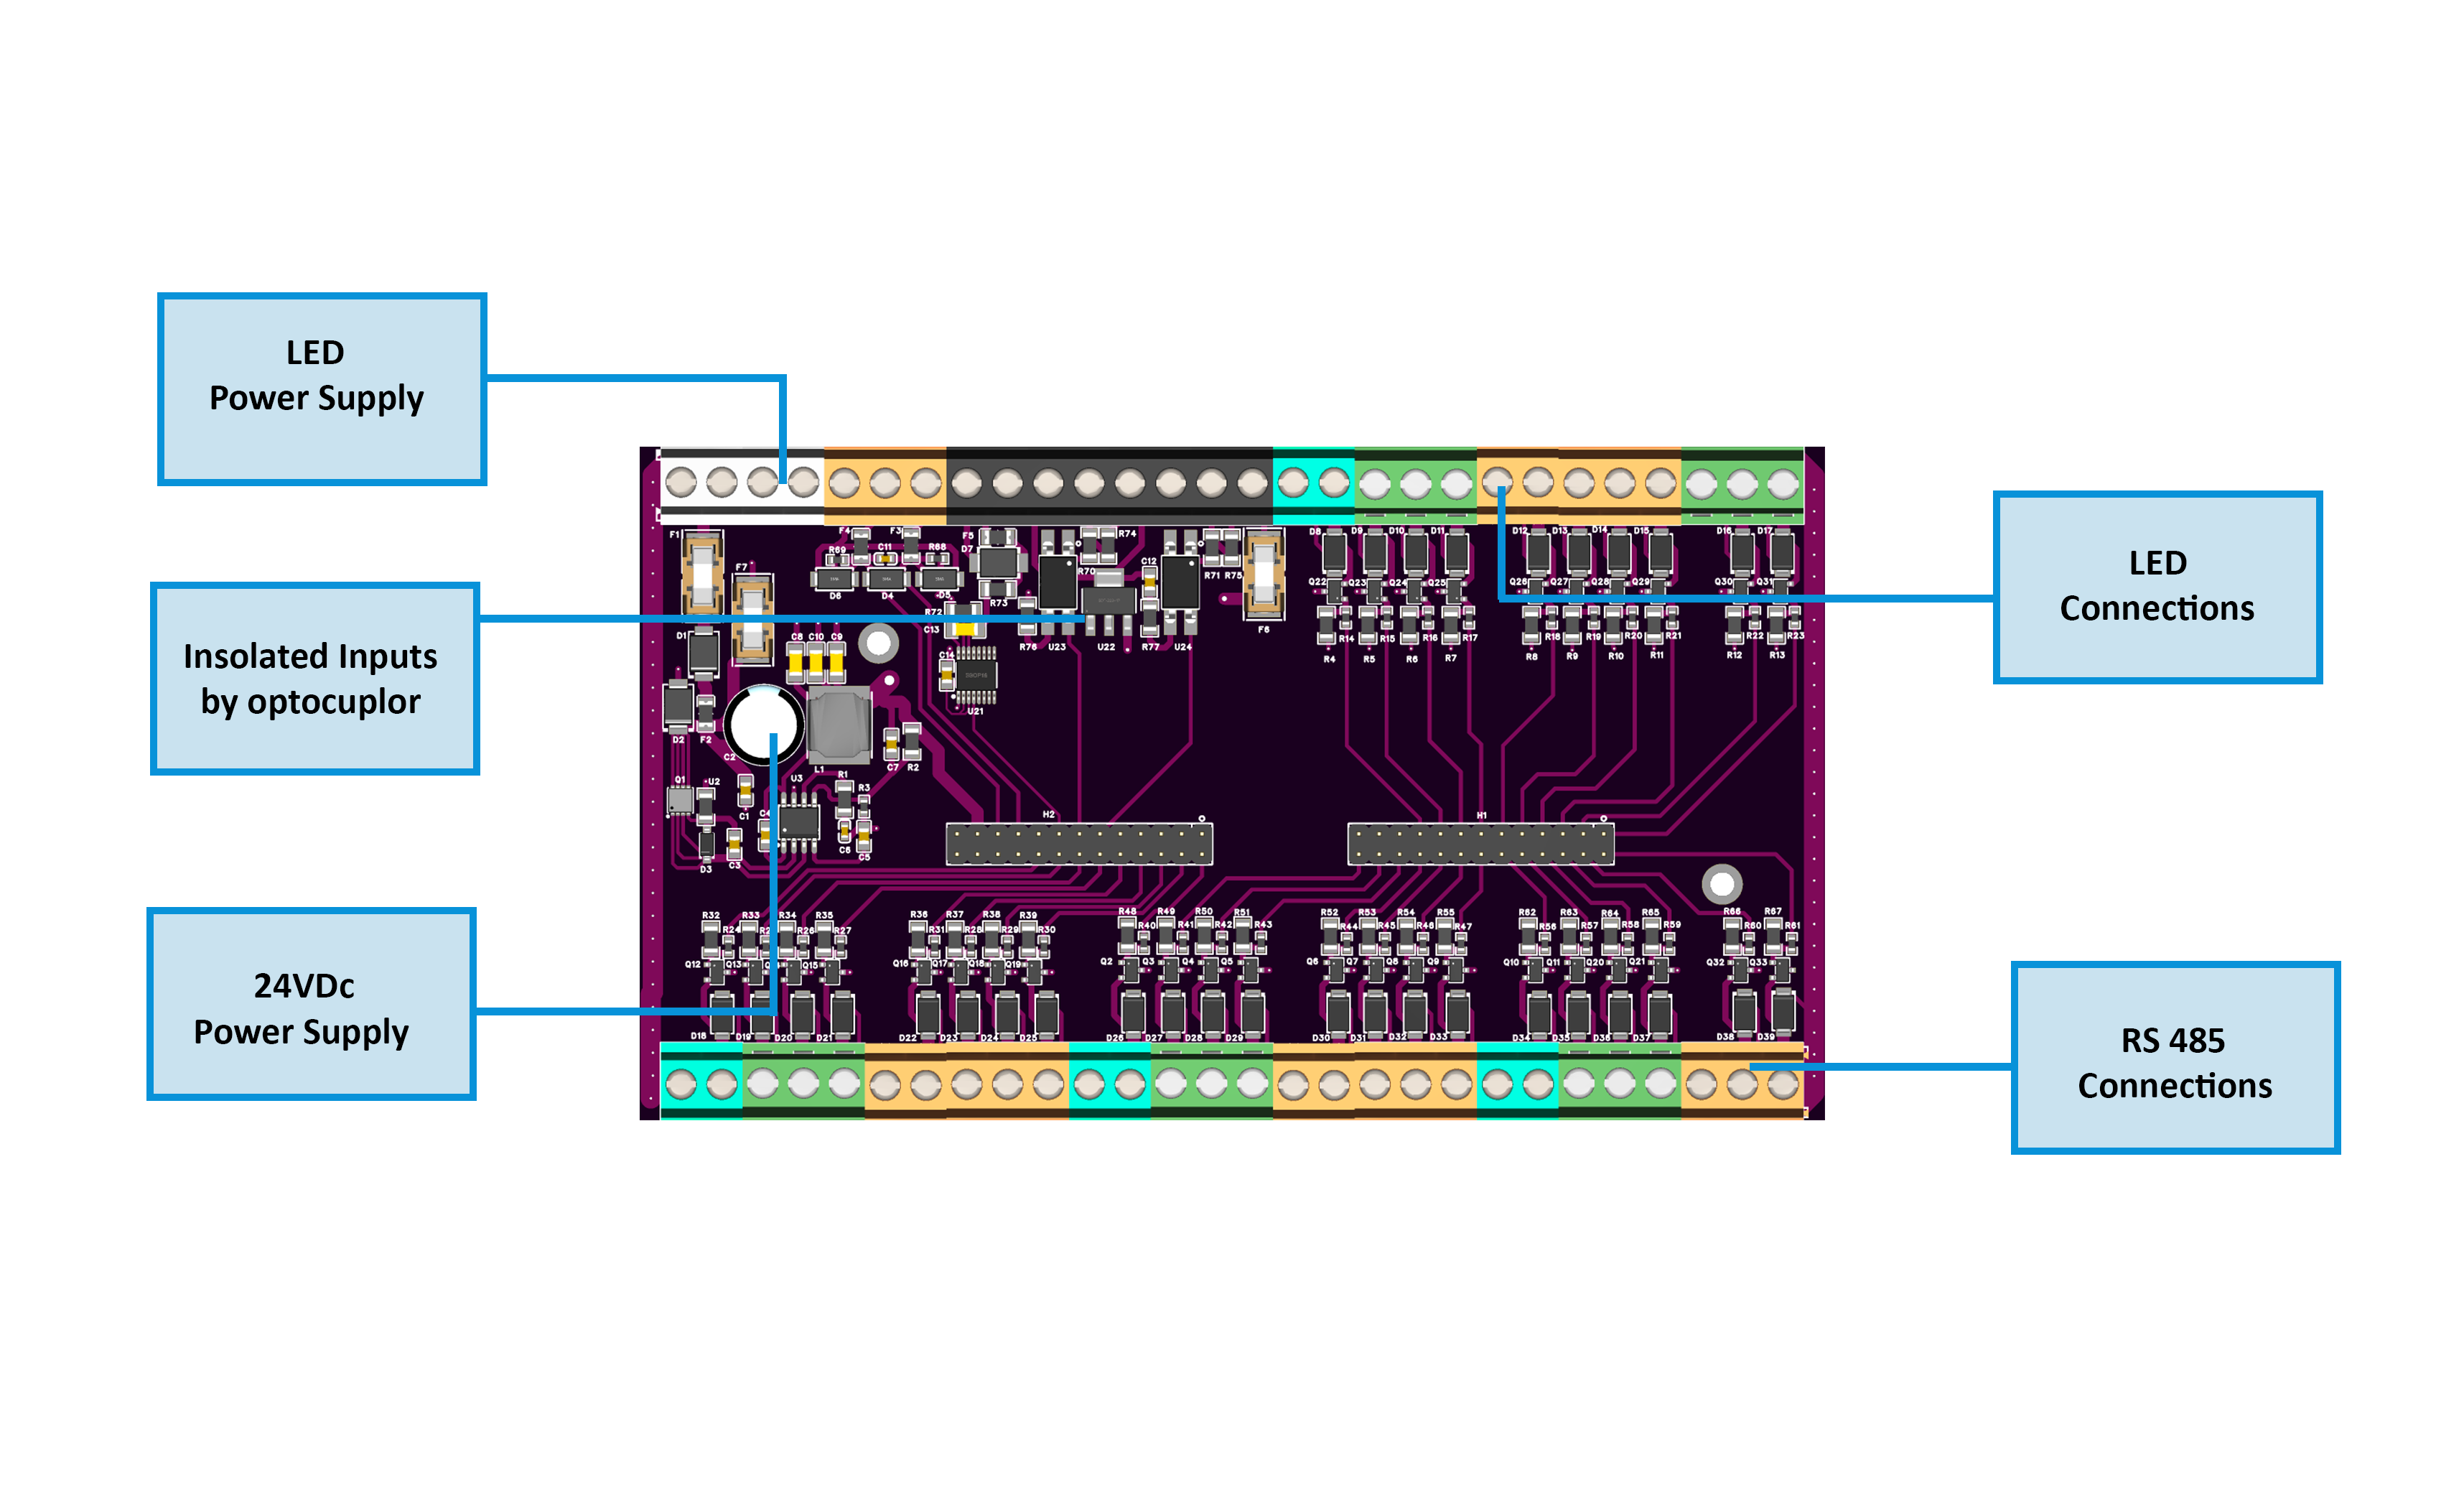
Top row (24Vdc | LED PS | RS-485 | DI 24Vdc | SENS.A | SENS.B | OUT O.1-O.10)
| Pos | Label | Group | Function |
|---|---|---|---|
| 1 | V+ | POWER | 24 V DC input |
| 2 | 0V | POWER | 24 V DC return |
| 3 | + | LED_PS | LED PSU positive |
| 4 | - | LED_PS | LED PSU negative |
| 5 | COM | RS485 | RS-485 signal reference |
| 6 | B | RS485 | RS-485 data - |
| 7 | A | RS485 | RS-485 data + |
| 8 | Gnd | DI | Discrete input return |
| 9 | I | DI | Discrete input |
| 10 | + | SENS_A | Presence sensor A supply |
| 11 | IN1 | SENS_A | Presence input A |
| 12 | Gnd | SENS_A | Presence A return |
| 13 | + | SENS_B | Presence sensor B supply |
| 14 | IN2 | SENS_B | Presence input B |
| 15 | Gnd | SENS_B | Presence B return |
| 16 | + | OUT_1_4 | Group rail for O.1-O.4 |
| 17 | O.1 | OUT_1_4 | Output 1 |
| 18 | O.2 | OUT_1_4 | Output 2 |
| 19 | O.3 | OUT_1_4 | Output 3 |
| 20 | O.4 | OUT_1_4 | Output 4 |
| 21 | + | OUT_5_8 | Group rail for O.5-O.8 |
| 22 | O.5 | OUT_5_8 | Output 5 |
| 23 | O.6 | OUT_5_8 | Output 6 |
| 24 | O.7 | OUT_5_8 | Output 7 |
| 25 | O.8 | OUT_5_8 | Output 8 |
| 26 | + | OUT_9_10 | Group rail for O.9-O.10 |
| 27 | O.9 | OUT_9_10 | Output 9 |
| 28 | O.10 | OUT_9_10 | Output 10 |
Bottom row (OUT O.11-O.32)
| Pos | Label | Group | Function |
|---|---|---|---|
| 1 | + | OUT_11_14 | Group rail for O.11-O.14 |
| 2 | O.11 | OUT_11_14 | Output 11 |
| 3 | O.12 | OUT_11_14 | Output 12 |
| 4 | O.13 | OUT_11_14 | Output 13 |
| 5 | O.14 | OUT_11_14 | Output 14 |
| 6 | + | OUT_15_18 | Group rail for O.15-O.18 |
| 7 | O.15 | OUT_15_18 | Output 15 |
| 8 | O.16 | OUT_15_18 | Output 16 |
| 9 | O.17 | OUT_15_18 | Output 17 |
| 10 | O.18 | OUT_15_18 | Output 18 |
| 11 | + | OUT_19_22 | Group rail for O.19-O.22 |
| 12 | O.19 | OUT_19_22 | Output 19 |
| 13 | O.20 | OUT_19_22 | Output 20 |
| 14 | O.21 | OUT_19_22 | Output 21 |
| 15 | O.22 | OUT_19_22 | Output 22 |
| 16 | + | OUT_23_26 | Group rail for O.23-O.26 |
| 17 | O.23 | OUT_23_26 | Output 23 |
| 18 | O.24 | OUT_23_26 | Output 24 |
| 19 | O.25 | OUT_23_26 | Output 25 |
| 20 | O.26 | OUT_23_26 | Output 26 |
| 21 | + | OUT_27_30 | Group rail for O.27-O.30 |
| 22 | O.27 | OUT_27_30 | Output 27 |
| 23 | O.28 | OUT_27_30 | Output 28 |
| 24 | O.29 | OUT_27_30 | Output 29 |
| 25 | O.30 | OUT_27_30 | Output 30 |
| 26 | + | OUT_31_32 | Group rail for O.31-O.32 |
| 27 | O.31 | OUT_31_32 | Output 31 |
| 28 | O.32 | OUT_31_32 | Output 32 |
Ports & service interfaces
| Id | Type | Note |
|---|---|---|
| USB-C | WebConfig / firmware interface (not for powering field devices). |
Housing notes
- Outputs are nine groups, each with its own + rail: top row 4+4+2, bottom row 4+4+4+4+4+2
- Low-side switching: load + to the group + rail, load - to O.n.
- Two separate presence inputs SENS.A and SENS.B, each with its own + and Gnd.
- Per channel <=1.5 A (ferrite BLM31PG601SN1L). Module total <=18 A.
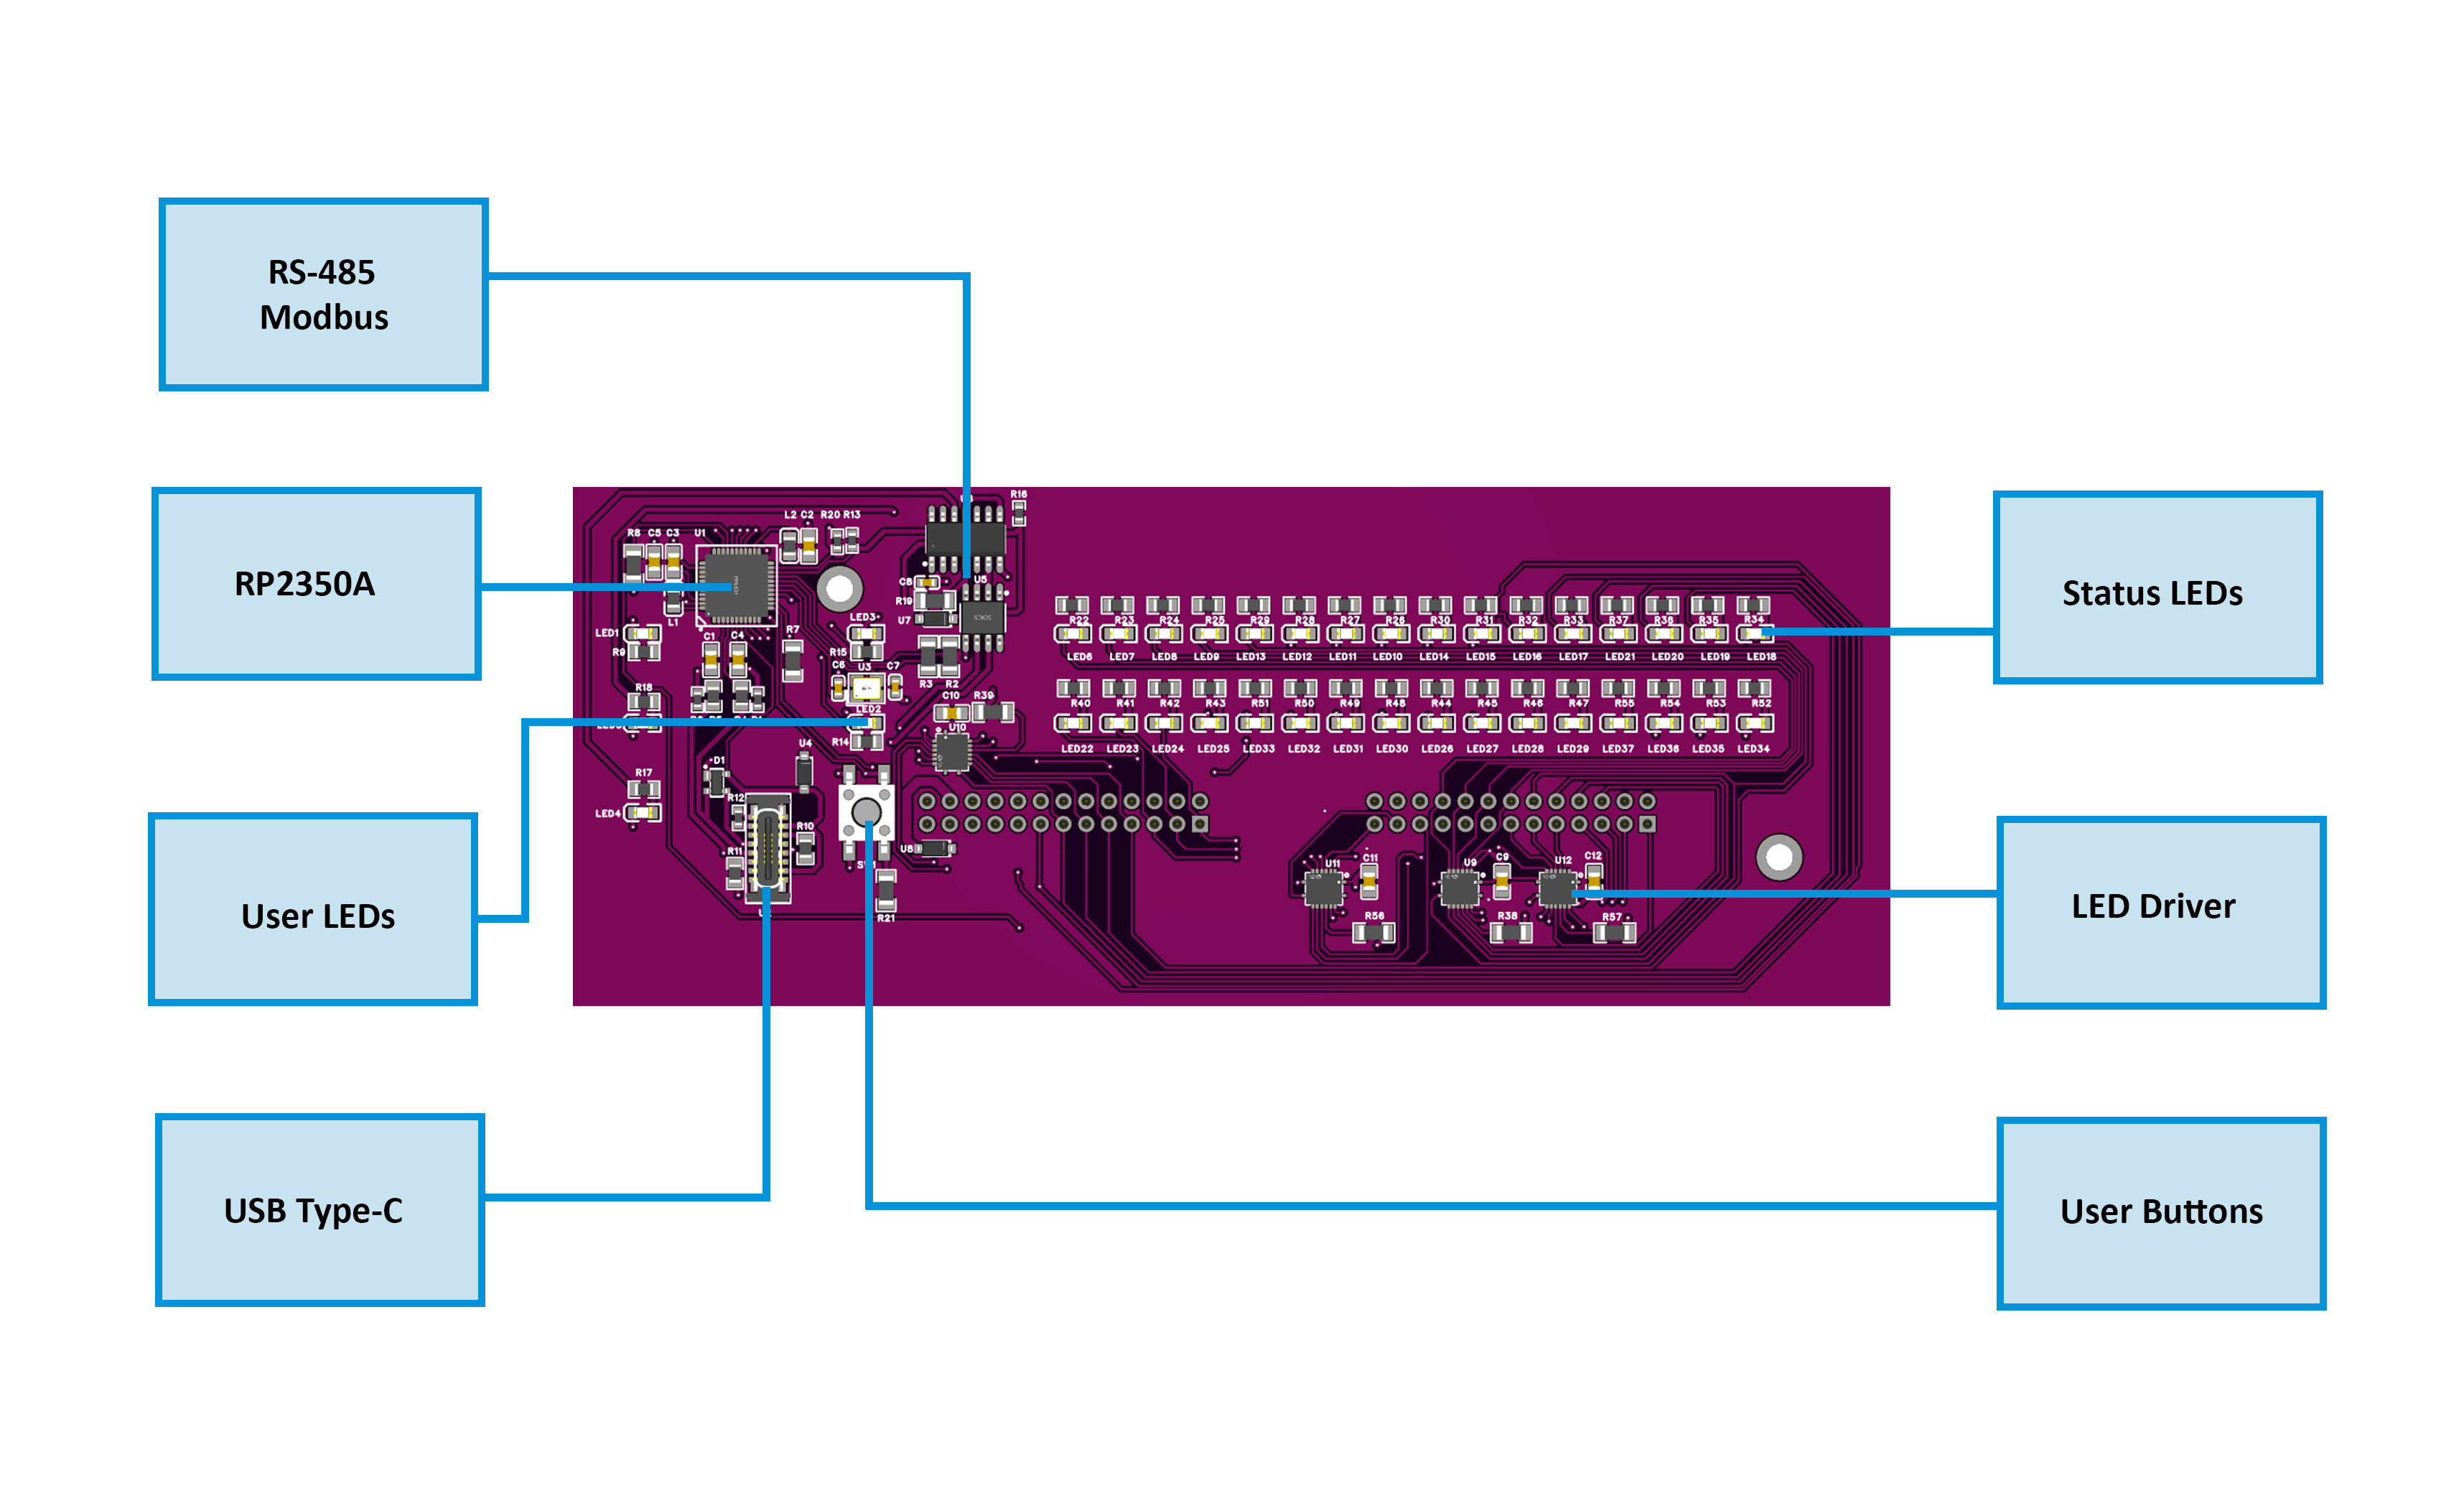
Top blocks: V+ / 0V (24 V DC module supply), LED PS +/- (12 or 24 V DC LED supply), SENS.A / SENS.B (fused +5 V sensor rails), IN1 / IN2 / GND (presence inputs). Output blocks: O1-O32 low-side outputs grouped with shared + rails. Comms block: A, B, COM (RS-485 Modbus RTU).
Output Wiring (O1-O32)
Output channels are low-side MOSFET sinks (AO4882). Connect the LED load + to the corresponding + group rail (12 or 24 V from the LED supply) and the load - to the channel terminal (O#). Each channel has a gate RC network and a ferrite; for inductive loads add an external RC or TVS snubber at the load. Maximum 1.5 A per channel; module total 18 A (field terminal path limit).
Digital Input Wiring (IN1, IN2)
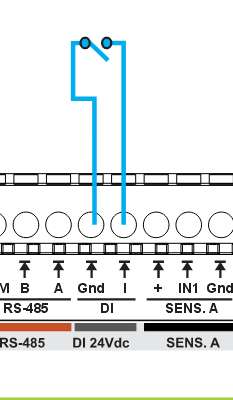
The DI input uses an ISO1212 IEC 61131-2 digital-input receiver, module-wetted: the field side is supplied from the module and is not galvanically isolated. Connect potential-free (dry) contacts — wall switches, push buttons, or relay / open-collector / transistor outputs that simply close DI to GND. The module supplies the wetting current from its own 24 V rail; do not feed external voltage into the input. There is no 24 V sensor-supply terminal for this input, so a three-wire 24 V sensor needs its own supply, with only its switching output wired to DI. For low-current presence sensors, use the IN1 / IN2 inputs instead — those have the fused +5 V SENS.A / SENS.B rails beside them (SFH6156 opto-coupled receiver, supplied from the module — not isolation). Each input has PTC fuse, TVS, and reverse protection. Do not exceed 30 V DC on input pins.
RS-485 / Modbus RTU
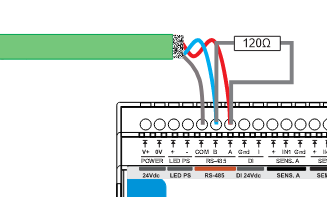
Terminal order differs across the HomeMaster range. Always read the silkscreen - do not wire by habit from another module. On this module the order is COM-B-A. Swapping A and B damages nothing but the node will not communicate. COM is required on every node.
All HomeMaster controllers and modules share the same RS-485 front end.
| Item | Value |
|---|---|
| Transceiver | MAX485CSA+T, half-duplex |
| Galvanic isolation | None — the transceiver shares the device's logic ground |
| Common-mode range | −7 V … +12 V referred to the device's own ground (MAX485 limit) |
| Terminals | A / B / COM |
| Surge protection | 3 × SMAJ6.8CA TVS (A–COM, B–COM, A–B) |
| Overcurrent | 2 × resettable PTC, 1.5 A hold, in series with A and B |
| EMI filtering | Common-mode choke on the A/B pair; COM referenced through 1 MΩ ∥ 4.7 nF |
| Idle state | Fail-safe biasing on board — do not add external bias resistors |
| Termination | 120 Ω at the two physical ends of the bus only |
Bus wiring rules — apply to every device on the bus:
- One twisted pair for A/B, 120 Ω characteristic impedance.
- Run COM to every node. Required, not optional: the ports are not isolated, and COM is what bounds the common-mode voltage the transceivers see.
- Prefer one power supply for the whole bus, distributed in star topology. With separate supplies, additionally tie the 0 V references together at a single point.
- Bond the cable shield to cabinet PE at one end only. Never land a shield on A, B or COM.
- Where the bus crosses into a different electrical installation with its own earthing reference — a utility or billing meter, another building, another cabinet's PE system — fit an external galvanic RS-485 isolator at that boundary. The on-board components are transient protection, not isolation, and will not survive a sustained ground-potential difference.
Cable Recommendations & Shield Grounding
General Routing Rules
- Route low-level signal cables (RS-485, DI) separately from power and LED wiring.
- If crossing power cables is unavoidable, cross at 90°.
- Keep cable runs as short as practical; avoid parallel runs with high-current conductors.
RS-485 (Modbus) Cable
- Twisted pair recommended (120 Ohm characteristic impedance).
- Shielded cable recommended in industrial environments.
- Use one twisted pair for A/B and a third conductor for COM. COM must be run to every node.
- Examples: J-Y(ST)Y 2×2×0.5 mm² or LI2YCY PiMF 2×2×0.50.
Shield Grounding
- Bond cable shield(s) to cabinet PE/EMC ground at one end (PLC side recommended).
- Do not connect shields directly to signal terminals (A/B/COM).
System Architecture & Pinout
Safety and Installation Notes
- Module logic: use only SELV/PELV 24 V DC on V+ / 0V. LED supply (+ / -) can be 12 or 24 V DC.
- Install inside a control cabinet; protect wiring terminals from accidental contact.
- Each module must have its own 24 V DC supply for V+ / 0V; do not bridge GND_FUSED and logic GND externally.
- Never connect mains voltage to any terminal - this is a SELV-only product.
- Size the separate LED PS field supply and wiring for up to 1.5 A per channel (18 A module total); use appropriate fusing on the LED PS supply. Do not share LED PS with module logic V+/0V.
- Sensor rails (SENS.A / SENS.B) provide limited fused +5 V output - do not backfeed external power.
- Installation and servicing by qualified personnel only.
Compliance & Certifications
The STR-3221-R1 module is CE marked. ISYSTEMS AUTOMATION S.R.L. (HomeMaster® brand) maintains the technical documentation and a signed EU Declaration of Conformity (DoC) available for download in the Documentation section above.
- EMC Directive 2014/30/EU - EN 55032:2015 (Class B emissions), EN 55035:2017 (immunity), tested by Idvorsky Laboratories Ltd. (Job #1648)
- RoHS Directive 2011/65/EU - EN IEC 63000 technical documentation
- Low Voltage Directive 2014/35/EU - does not apply (SELV-only product, 24 V DC nominal, no mains-capable terminals)
- HomeMaster® - registered EU trademark (EUTM No. 019082911, EUIPO, registered 15 January 2025)
Licensing. Hardware design files — schematics, PCB layouts and bills of materials — are published under CERN-OHL-W v2. Firmware and the ESPHome integration packages are published under the MIT licence. Full terms are in the LICENSE files in the HOMEMASTER repository.
Related products
These other products might interest you