
ESPHome Smart Home Devices: Local Automation Without Cloud Dependency
By Dmitry Drezyulya · Updated May 3, 2026 · ~14 min read
ESPHome is one of those tools you can install in an afternoon and use for the next ten years. It runs on cheap, widely-available ESP32 hardware, configures with a single YAML file, and integrates with Home Assistant through a fast native API — no cloud, no MQTT broker required (though MQTT is supported if needed), no vendor lock-in.
This guide covers what ESPHome is, why HomeMaster uses it on its controllers, how the controller-plus-modules architecture works in practice, and how to install, configure, and troubleshoot it. By the end you should know exactly when to choose ESPHome and how to get a stable production system running with it.
What is ESPHome?
ESPHome is open-source firmware for ESP32, ESP8266, and a growing list of other microcontrollers (BK72xx, RP2040, RTL87xx). Instead of writing code in C++, you describe what you want the device to do in a YAML file. ESPHome compiles this into firmware and flashes it to the device.
The result is a device that is configured to perform a well-defined set of tasks — read these sensors, drive these relays, communicate with these other devices — and does so without external dependencies. No cloud server is required. If you turn off your internet, your ESPHome devices keep working.
ESPHome is maintained by the Open Home Foundation, the same organization behind Home Assistant, and integrates with Home Assistant through a built-in API — not MQTT, not HTTP polling, but a dedicated protocol designed for low-latency local communication..
Why HomeMaster uses ESPHome — on the controllers and gateways
HomeMaster's architecture has three clear roles, and each device runs the firmware best suited to its job:
- Controllers (MiniPLC, MicroPLC) run ESPHome on ESP32. They are the brain of the system — orchestrating expansion modules over Modbus, exposing everything to Home Assistant, and running cross-device automation logic.
- OpenTherm Gateway (OpenTherm Gateway) also runs ESPHome on ESP32, but in a different role. It does not orchestrate Modbus modules. Instead, it speaks the OpenTherm protocol to your boiler and reports thermostat/boiler data directly to Home Assistant. It is a standalone ESPHome device dedicated to one job — modulating heat.
- Expansion modules (DIO-430, DIM-420, RGB-621, ENM-223, WLD-521, ALM-173, AIO-422, STR-3221) run dedicated Arduino firmware on RP2350 and communicate with a controller over RS-485 Modbus. They do not run ESPHome themselves.
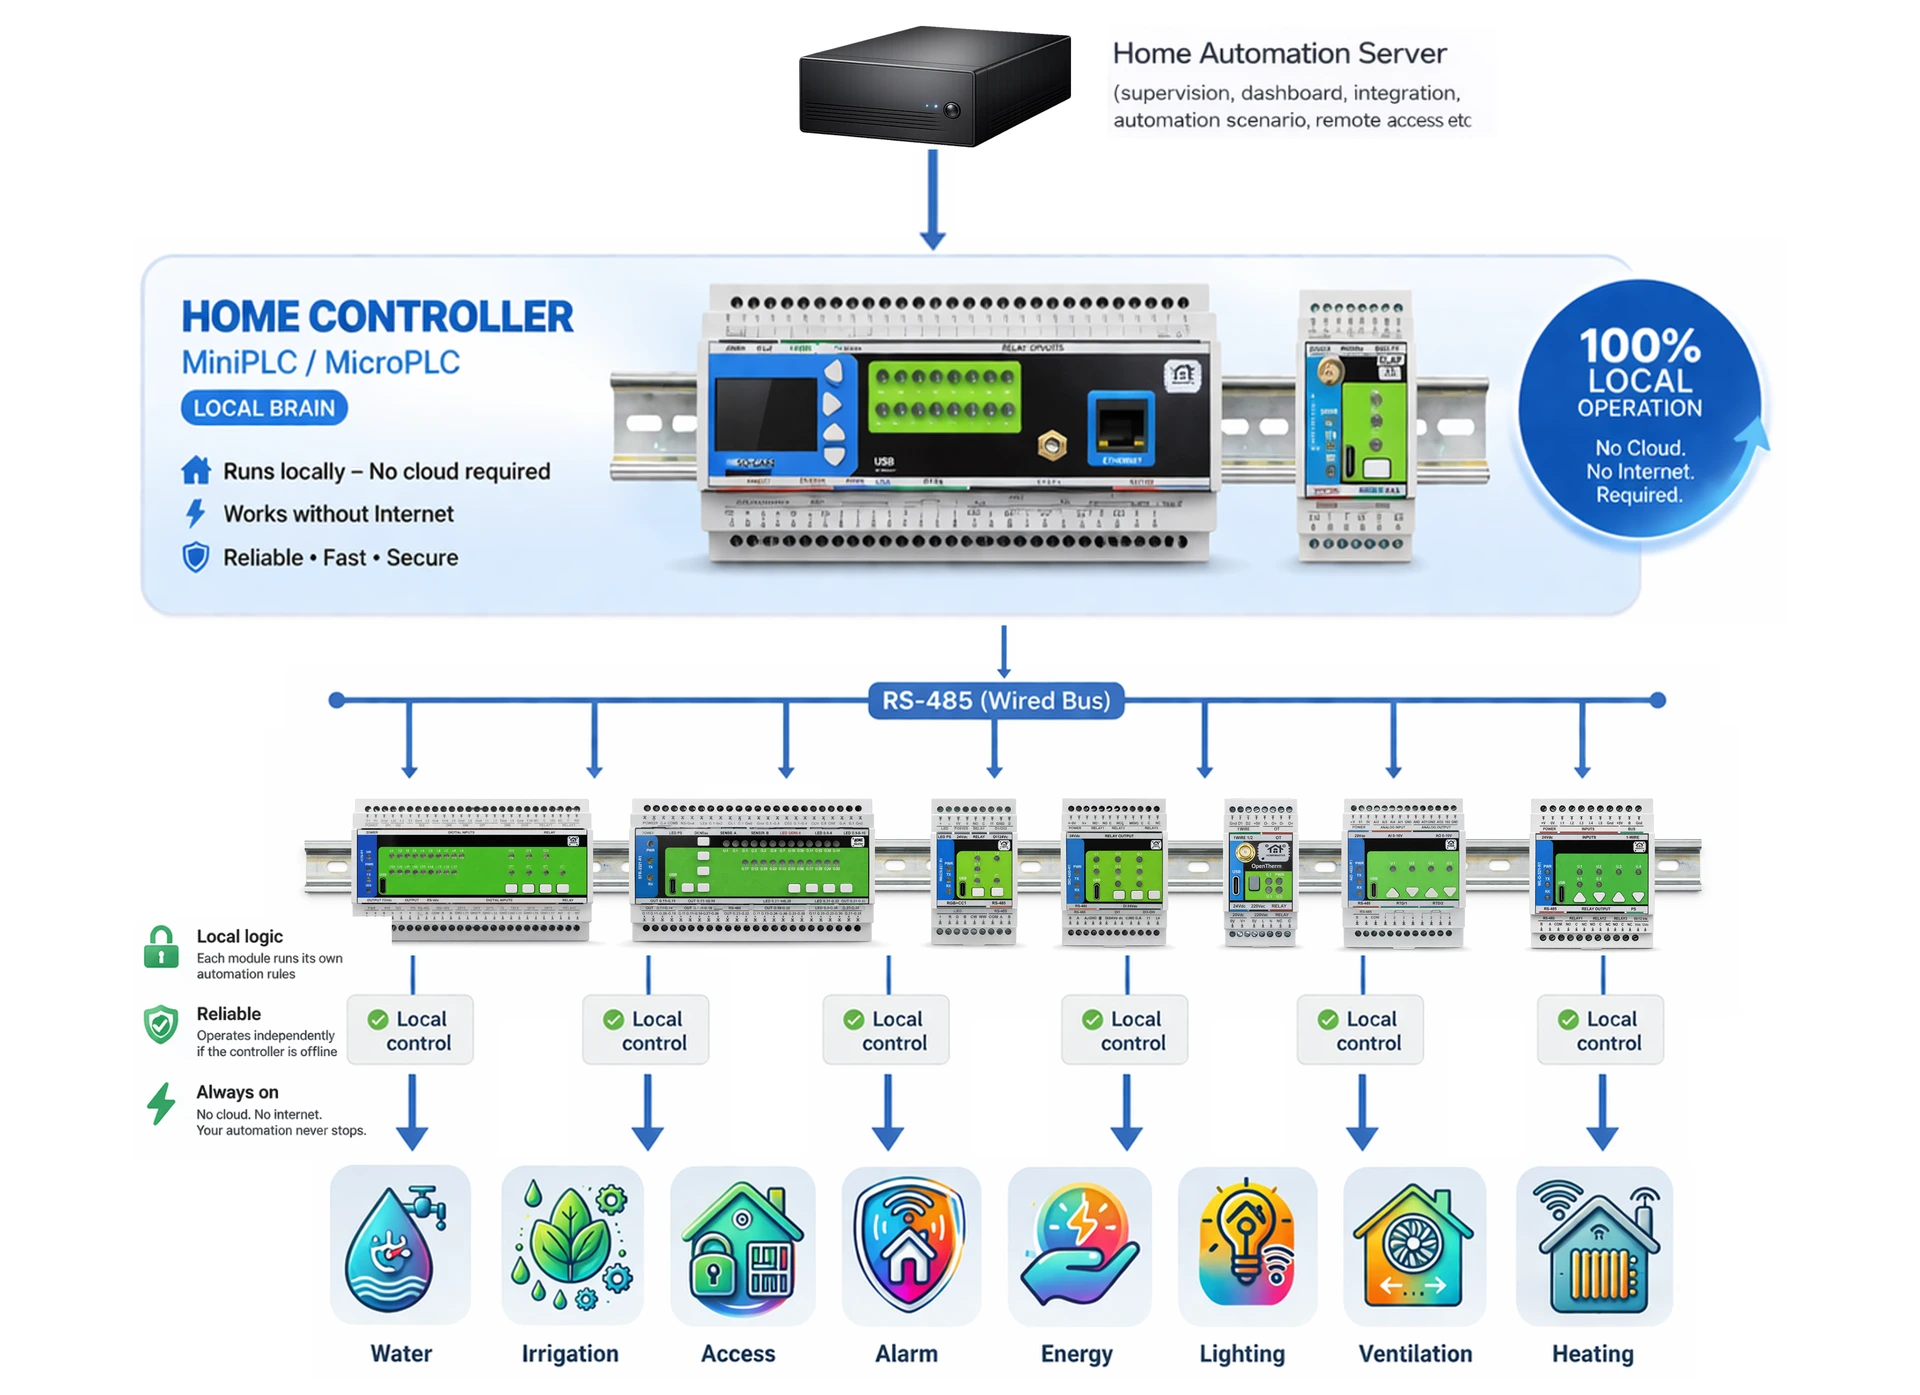
Why split them this way? Because each role has different requirements.
The controllers need network connectivity, complex configuration, and easy integration with Home Assistant — that is exactly what ESPHome on ESP32 is best at. The modules need deterministic real-time control of physical I/O — exact relay timings, dimmer phase angle calculations — which is best done in tight Arduino-style firmware on RP2350 without the overhead of a network stack. The OpenTherm Gateway sits in between: it needs the network stack (to report to Home Assistant) but it does not host other modules — so ESPHome on ESP32, configured for OpenTherm specifically, is the cleanest fit.
Both controllers also include a hardware RTC chip (PCF8563) with its own backup battery. After the initial NTP sync, time persists across power outages and internet loss without re-sync. When the controller boots after a power loss, it knows the correct time immediately and resumes scheduled tasks. Logs have correct timestamps. A scheduled "turn on heating at 6:00 AM" runs at 6:00 AM whether the network has been down for an hour or a week (during the outage itself nothing executes — there is no power — but resumption is instant on power-up). This is one of those small hardware decisions that distinguishes robust system design from typical consumer-grade hardware.
The result: each module keeps doing its physical-world job even if the controller reboots or loses WiFi. The controller keeps orchestrating modules even if Home Assistant goes down. The OpenTherm Gateway keeps reading and modulating boiler data even if the rest of the smart home is offline. The system is layered, and each layer can fail independently without taking the others down.
The full set of HomeMaster ESPHome configs (controllers and OpenTherm Gateway) and module Arduino firmware is published on GitHub — clone, modify, contribute.
ESPHome on ESP32 vs ESP8266 vs other chips
ESPHome supports several chip families, and the choice matters more than people realize.
ESP8266 is the original target — small, cheap, with roughly 50–80 KB of usable RAM depending on configuration. It works for simple devices: a single switch, a temperature sensor, a small relay board. But it has limits. It cannot run multiple complex components at once without watchdog resets. It has only one core. Bluetooth is not supported. For new projects in 2026, we do not recommend ESP8266 unless you have a specific reason — cost optimization for high-volume retail, mostly.
ESP32 is the workhorse. Two cores, hundreds of KB of usable RAM (typically ~300–400 KB available to applications out of the chip's 520 KB SRAM), Bluetooth, a much more reliable WiFi stack, and support for advanced peripherals like CAN bus, RMT, and full LVGL displays. The ESP32 line has grown over the years into a family of variants — the original ESP32, plus S2, S3, C3, C6, H2 and others — each with its own combination of cores, radios, and USB capability. ESPHome supports all of them; for most smart home automation work, the differences do not matter. All HomeMaster ESPHome devices — MiniPLC, MicroPLC, and OpenTherm Gateway — are built on ESP32-WROOM modules ( ESP32-WROOM-32U-N16 with 16 MB flash). WROOM is the proven, widely-stocked variant with mature ESPHome support and no surprises in production.
RP2040 / RP2350 (Raspberry Pi Pico family). ESPHome supports the WiFi-equipped variants (RP2040 + CYW43 wireless on Raspberry Pi Pico W) since 2023. Pure RP2350 without a WiFi module is not a typical ESPHome target — without networking, ESPHome has nothing to talk to Home Assistant over. HomeMaster modules use bare RP2350 running custom Arduino firmware — not ESPHome — for fast deterministic control of physical I/O. The choice is deliberate: the module does not need WiFi or a network stack (it speaks Modbus to the controller over RS-485), it needs precise timing, and Arduino on RP2350 delivers that with a much smaller footprint than ESPHome would.
BK72xx and RTL87xx are Tuya/Realtek chips that ESPHome added more recently. Support exists, but is less mature and not recommended for production deployments.
For new builds where you want network-connected controllers, default to ESP32. For dedicated I/O modules behind a Modbus bus, RP2350 with Arduino is the cleaner choice — which is the path HomeMaster took.
How a HomeMaster system is configured — packages over Modbus
A HomeMaster controller manages every connected module through one ESPHome YAML file. You do not write Modbus register addresses by hand. Each module ships with a default ESPHome package — a YAML file that defines all that module's registers, sensors, switches, and exposed entities. You include it from the controller config and pass three small variables for each connected module.
The result: adding a new module to your system is a short block of YAML.
Here is what a real MicroPLC configuration looks like with three connected modules — a relay module, a dimmer, and an analog/RTD acquisition module on the same RS-485 bus:
yaml
uart:
  tx_pin: 17
  rx_pin: 16
  baud_rate: 19200
  id: uart_modbus

modbus:
  id: modbus_bus
  uart_id: uart_modbus

packages:
  dio1:
    url: https://github.com/isystemsautomation/homemaster-dev
    ref: main
    files:
      - path: DIO-430-R1/Firmware/default_dio_430_r1_plc/default_dio_430_r1_plc.yaml
        vars:
          dio_prefix: "DIO#1"     # Friendly name prefix shown in Home Assistant
          dio_id: dio_1           # Unique ESPHome identifier
          dio_address: 1          # Modbus address (must match what's set in the module)

  dim1:
    url: https://github.com/isystemsautomation/homemaster-dev
    ref: main
    files:
      - path: DIM-420-R1/Firmware/default_dim_420_r1_plc/default_dim_420_r1_plc.yaml
        vars:
          dim_prefix: "DIM#1"
          dim_id: dim_1
          dim_address: 2

  aio1:
    url: https://github.com/isystemsautomation/homemaster-dev
    ref: main
    files:
      - path: AIO-422-R1/Firmware/default_aio_422_r1_plc/default_aio_422_r1_plc.yaml
        vars:
          aio_prefix: "AIO#1"
          aio_id: aio_1
          aio_address: 3
Three things in this configuration are worth understanding.
The uart and modbus blocks define the shared RS-485 bus that all expansion modules speak over. The MicroPLC acts as the Modbus master, every connected module is a slave with its own address. The baud_rate (19200) and the id of both blocks must match what each external package expects.
The packages: section pulls module definitions from the HomeMaster GitHub repository. For each module you provide:
- A unique key (dio1, dim1, aio1) — names the package locally
- url: and ref: main — the repo and branch to fetch from
- path: — where in the repo the module's default plc YAML lives
- vars: — three values per module: a friendly prefix (the name shown in Home Assistant, e.g. "DIO#1"), an internal id (used by ESPHome for entity references), and the Modbus address that you set on the module via WebConfig
Each module's package contains everything: the Modbus controller declaration, all registers mapped to sensors and switches, exposed numbers, lights, and any module-specific logic (PID parameters, dimmer curves, etc.). Once included, the module appears in Home Assistant with all entities ready — no manual register mapping.
Module addresses must be unique on the bus. If you wire two DIO-430 modules to the same MicroPLC, give them different _address values (e.g., 1 and 4), and configure each module's address through its WebConfig interface over USB-C before deploying.
If you build your own modules, you can write your own external packages and host them on your own GitHub. The packages: mechanism is a standard ESPHome feature, not a HomeMaster invention.
One caveat for builds. The HomeMaster repository uses ref: main (no tagged releases yet). ESPHome caches downloaded packages locally so repeated compilations do not re-fetch, but if you build on multiple machines or in CI, set a GITHUB_TOKEN environment variable to avoid GitHub's 60-requests/hour rate limit on unauthenticated access. When tagged releases become available, you will be able to pin to a specific version for stricter reproducibility.
Setting up and customizing a HomeMaster controller
Every HomeMaster controller — MiniPLC, MicroPLC, and OpenTherm Gateway — ships pre-flashed with a working ESPHome configuration. The setup workflow is the same for all three.
Out-of-the-box workflow
- Power on the controller. Mount on DIN rail, connect power, that is it.
- Provision Wi-Fi via Improv. Open improv-wifi.com in a Chrome-based browser, connect to the device over USB-C or Bluetooth, enter your Wi-Fi credentials. The device joins your network.
- Open ESPHome Dashboard (the Home Assistant add-on, install from the Add-on Store). The newly provisioned controller appears automatically because each device's YAML includes a dashboard_import: block pointing at its default firmware on GitHub.
- Click "Take Control" to import the full configuration into your Dashboard. The device also appears in Home Assistant under Settings → Devices & Services → ESPHome.
- Edit the YAML as needed (see next section), then click Install in the Dashboard. ESPHome compiles your config and flashes the controller over Wi-Fi via OTA. No USB cable required after the first power-on.
When you actually need to edit the YAML
How much you change depends on which controller you have:
- MiniPLC. The default YAML already configures all built-in I/O — relays, digital and analog inputs, the OLED display, temperature sensors. If you only use the on-board I/O, you can run the default config as-is. Most users still edit it to add automations, rename entities, or set up scenes specific to their installation.
- MicroPLC. The default YAML is a bare controller — it does not know about any expansion modules until you add them. You will almost always edit the YAML to declare connected modules under packages: (see the configuration example earlier in this guide). Without those declarations, the MicroPLC has nothing to talk to over Modbus.
- OpenTherm Gateway. The default YAML exposes the common OpenTherm registers — boiler flow temperature, DHW setpoint, modulation level, fault flags — that are present on essentially every OpenTherm boiler. Forboiler-specific OpenTherm IDs that go beyond the common set, you edit the YAML to add the extra OpenTherm IDs your boiler supports. The default works on day one; the customization is for getting the most out of your specific boiler.
Two things to know about Take Control
1. dashboard_import overwrites your edits. The default YAML contains:
yaml
dashboard_import:
  package_import_url: github://isystemsautomation/homemaster-dev/...
  import_full_config: true
While import_full_config: true is set, every Dashboard import re-imports the upstream config and overwrites your local YAML. After your first successful import, set import_full_config: false (or remove the dashboard_import: block entirely) to preserve your changes.
2. Taking Control changes how vendor-managed OTA works. The default firmware ships with both ESPHome OTA (user-controlled) and HTTP OTA (vendor-managed via HomeMaster's hosted manifest). After Take Control, vendor OTA continues to work only if you keep the http_request:, ota: platform: http_request, and update: blocks in your YAML. If you remove them, you switch to ESPHome-OTA-only and update the controller yourself from the Dashboard.
What if something goes wrong
If a flash fails or the controller stops responding to OTA, you can always reflash over USB-C using the ESPHome Web Tool — connect via USB-C, select the pre-built firmware .bin from the homemaster-dev GitHub repository, and reflash. The chip cannot be permanently bricked through normal flashing procedures.
Modules: no ESPHome involved
Expansion modules (DIO-430, DIM-420, RGB-621, ENM-223, and the rest of the lineup) run dedicated Arduino firmware on RP2350 and speak only Modbus. They are not ESPHome devices — the controller's ESPHome config talks to them through packages: and Modbus, which is all you need to know on the ESPHome side.
Module setup is a one-time event during installation, not something you touch daily. You configure each module once through its WebConfig interface over USB-C — Modbus address, channel modes, and module-specific settings (RTD reference resistor on AIO-422, dimmer curve on DIM-420, alarm zones on ALM-173) — and the settings are saved to persistent storage. After that, the module runs untouched for years, doing its job over Modbus. Module firmware is open-source on the homemaster-dev GitHub repository — modify it if you ever need to. Periodic firmware updates from HomeMaster are published as .uf2 files.
OTA updates: how to keep ESPHome devices stable
OTA — Over-The-Air updates — is how you push firmware changes to the controller over WiFi without unplugging anything. Done right, it is invisible and reliable. Done incorrectly, it is a common source of device recovery issues.
Safe mode is auto-active in modern ESPHome. As of recent ESPHome versions (2024.6+), the OTA component automatically activates safe_mode for the first 10 boot attempts after a flash. If a new firmware causes the controller to fail boot 10 times in a row, ESPHome reboots into safe mode — a reduced-functionality state that keeps WiFi and OTA running so you can flash a fixed config. Safe mode does not restore the previous firmware; it gives you a working OTA endpoint to push a fix.
A minimal OTA block is enough — explicit safe_mode: is no longer required:
yaml
ota:
  - platform: esphome
    password: !secret ota_password
If you need to override defaults (longer reboot timeout, more attempts), the explicit form is still supported:
yaml
ota:
  - platform: esphome
    password: !secret ota_password
    safe_mode: true
    num_attempts: 10
    reboot_timeout: 5min
Two OTA paths in HomeMaster controllers
OTA — Over-The-Air updates — is how you push firmware changes to the controller over WiFi without unplugging anything. All HomeMaster controllers ship with two OTA mechanisms enabled out of the box, and the choice between them is the most consequential firmware decision you will make.
Path 1: ESPHome OTA (user-controlled). You take control in ESPHome Dashboard and push your own firmware. Standard ESPHome OTA flow — your YAML, your build, fully under your control.
Path 2: Vendor-managed OTA (HTTP). The device exposes a firmware update entity in Home Assistant that polls a HomeMaster-hosted manifest every 6 hours. When a new tested vendor firmware is published, you install it with one click from Home Assistant.
⚠️ Critical: Vendor OTA replaces your customizations. Path 2 pushes a complete firmware image built from the upstream HomeMaster default YAML — not your YAML. If you have edited the controller's configuration (added packages: for expansion modules, added automations, renamed entities, written lambda blocks), a vendor update will overwrite all of that and revert the device to the vendor's default behavior.
If you have customized your YAML, use Path 1 only. Remove the update:, http_request:, and ota: platform: http_request blocks from your YAML after Take Control to disable vendor OTA, and set import_full_config: false (or remove dashboard_import: entirely) to prevent Dashboard re-imports from overwriting your config.
The trade-off is convenience vs. control. Vendor OTA is the right choice for installations running the default config (a standalone MiniPLC, an OpenTherm Gateway with default boiler features). Path 1 is the right choice for any installation with a MicroPLC and modules, since the MicroPLC config always needs customization.
A few practical notes:
- Safe mode is built into ESPHome. When you configure an ota: component, ESPHome automatically enables safe mode — if the device fails to boot 10 times in a row, it reboots into a reduced-functionality state that keeps WiFi and OTA running so you can flash a fix. You do not need to declare anything for this; for advanced configuration see the ESPHome safe mode docs.
- Don't interrupt a firmware update. If interrupted mid-flash, the device may fail to boot and require USB-C reflashing via the ESPHome Web Tool.
- Set an OTA password when you take control. The default HomeMaster YAML ships without one — Path 2 (vendor OTA) does not need a password, but as soon as you switch to Path 1, add a password to prevent anyone on your network from flashing the device.
- Vendor OTA security model. Firmware is downloaded over HTTPS from GitHub Pages. Trust depends on the HomeMaster GitHub account; firmware is not separately code-signed. Use Path 1 if you require a stricter trust model.
ESPHome vs Tasmota — when to pick which
Both Tasmota and ESPHome run on ESP8266/ESP32 and target the smart home market. They look similar at first glance but have very different philosophies.
Tasmota is firmware-first. You install the binary on a device and configure it through a web UI or MQTT commands. Its strength is that it works on a huge range of consumer devices (Sonoff, Shelly Gen1, generic Tuya converts) without compiling anything. You buy a $5 smart plug, flash Tasmota, and it works.
ESPHome is configuration-first. You write a YAML file describing what your device should do, then compile it into custom firmware. The compiled firmware contains exactly what you need — nothing more — making it lighter and faster than Tasmota for the same hardware.
Pick Tasmota if:
- You are converting consumer devices and do not want to compile firmware.
- You prefer a web UI over editing YAML.
- You use MQTT as your primary protocol and want broad MQTT support out of the box.
- You want OpenHAB or Domoticz integration in addition to Home Assistant.
Pick ESPHome if:
- You are building or buying purpose-designed hardware (like HomeMaster controllers).
- You use Home Assistant as your primary platform — ESPHome's native API is significantly faster than MQTT.
- You want firmware that is custom to your exact use case, no extra components running.
- You want logic to run on the device itself for fail-safe behavior.
For HomeMaster controllers, ESPHome is the right choice because we know exactly what each controller orchestrates and ship a tuned config with module packages ready to include. For converting a $10 smart plug from a flea market, Tasmota is probably easier.
Where Home Assistant fits
ESPHome makes the controller smart. Home Assistant makes everything work together. They are different layers solving different problems.
A HomeMaster controller running ESPHome can already run logic on its own — turn on a relay when temperature exceeds a threshold, blink a light at a schedule, coordinate multiple modules through Modbus. But cross-controller coordination, mobile app access, voice control, complex multi-step automations, and historical data — that is Home Assistant's job.
The architecture works in three layers, each independent:
- Modules keep doing their I/O job through their RP2350 firmware even if the controller is rebooting.
- Controller keeps orchestrating modules through ESPHome — and keeps accurate time through its hardware RTC — even if Home Assistant and the internet are both down.
- Home Assistant adds the dashboard, apps, and complex automations on top.
If Home Assistant goes down for an hour, your house keeps working. If your internet goes down for a week, your scheduled automations still fire on time. That is what local-first means in practice.
What you get in the end
When ESPHome is set up correctly on the controller, and the modules are talking through Modbus, you stop thinking about the firmware layer. Devices appear in Home Assistant. They do what they were configured to do. They survive power outages. They survive Home Assistant restarts. They survive losing internet for a week.
This is not zero-maintenance — every system benefits from occasional firmware updates and config reviews. But it is far less work than maintaining a cloud-connected smart home, and the system is yours forever. No vendor can decide tomorrow that your devices are unsupported.
That is what local automation means in practice.
Frequently Asked Questions
MiniPLC controller, the MicroPLC controller, and the OpenTherm Gateway. All three are ESP32-WROOM-based and ship pre-flashed with a working ESPHome configuration. The eight expansion modules (DIO-430, DIM-420, RGB-621, ENM-223, WLD-521, ALM-173, AIO-422, STR-3221) use dedicated Arduino firmware on RP2350 and communicate with a controller over Modbus RS-485 — they do not run ESPHome themselves.
Yes. A HomeMaster controller running ESPHome operates fully standalone — its YAML logic runs locally on the device and does not require any external server. Without Home Assistant you lose the unified dashboard, cross-device automations, and historical data, but the controller itself keeps reading sensors, talking to expansion modules over Modbus, and executing whatever automations are defined in its config.
The controller and all connected modules keep working unaffected. The controller continues to run its automation logic locally; the modules continue their physical I/O over the wired Modbus bus. The controller reconnects to WiFi and Home Assistant automatically when the network comes back. For installations where WiFi reliability matters, MiniPLC supports Ethernet — wired networking eliminates this entire class of problems.
Yes. Both MiniPLC and MicroPLC include a hardware RTC chip (PCF8563) with its own backup battery. After the initial NTP sync, the controller maintains accurate time across power outages and extended internet loss. Scheduled automations — "turn on heating at 6:00 AM", "arm alarm at 22:00", "water the garden every Tuesday at sunrise" — fire on time even if the network has been disconnected for a week. When internet returns, ESPHome's SNTP component re-syncs the RTC silently in the background to correct any drift.
If you use the vendor-managed OTA path (the default Path 2 in our OTA section), yes — vendor updates push the upstream HomeMaster default firmware and replace any local YAML edits. If you have customized the controller's YAML (added packages: for expansion modules, written custom automations, renamed entities), use Path 1 (ESPHome OTA) only. Take Control in ESPHome Dashboard, then remove the update:, http_request:, and ota: platform: http_request blocks from your YAML to disable vendor OTA, and set import_full_config: false (or remove dashboard_import: entirely) to prevent Dashboard re-imports from overwriting your config.
Edit the controller's ESPHome YAML and add a block under packages: for the new module. For example, to add an ENM-223 energy meter:
yaml
packages:
  enm1:
    url: https://github.com/isystemsautomation/homemaster-dev
    ref: main
    files:
      - path: ENM-223-R1/Firmware/default_enm_223_r1_plc/default_enm_223_r1_plc.yaml
        vars:
          enm_prefix: "ENM#1"
          enm_id: enm_1
          enm_address: 4
Set the module's Modbus address through its WebConfig interface (over USB-C) to match enm_address, click Install in ESPHome Dashboard, and the module's sensors appear in Home Assistant once the controller boots with the updated config.
Yes — full customization is the normal path for any installation beyond a standalone MiniPLC. After Take Control in ESPHome Dashboard, you can edit the YAML freely: add automations, write lambda blocks for inline C++ expressions, register custom components in C++, override module package variables, add HA template sensors, change update intervals, and so on. The default HomeMaster firmware is a starting point, not a commitment. The only caveat: if you customize, switch to ESPHome OTA only (Path 1) so vendor updates don't overwrite your changes.
Related Guides

Home Assistant Automation
Learn how to build and manage a smart home using Home Assistant.
Discover automation logic, device integration, dashboards, and local control without cloud dependency
Get the hardware
Looking to build with ESPHome on tested industrial-grade controllers? Browse the HomeMaster product catalog — every controller ships with ready-to-use ESPHome firmware, dual OTA paths (user-controlled + vendor-managed), and supports the full module lineup through one-line packages: includes.
The three ESPHome-based devices in the HomeMaster lineup:

MiniPLC — All-in-one ESP32-WROOM controller with relays, I/O, display, Ethernet, hardware RTC with backup battery, and dual OTA paths

MicroPLC — Minimal ESP32-WROOM controller for modular expansion via RS-485 Modbus, with hardware RTC for offline timekeeping and dual OTA paths
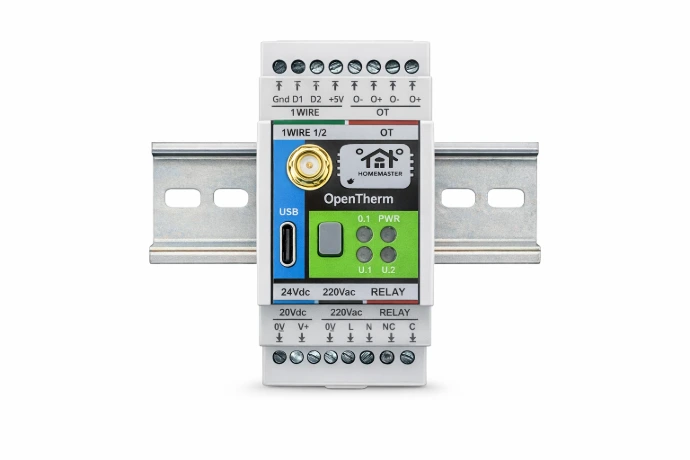
OpenTherm Gateway — ESP32-WROOM gateway with hardware OpenTherm interface for direct boiler control, dual OTA paths, and Improv Wi-Fi setup