Lighting Every Stair Step Individually with Home Assistant
Lighting a staircase is easy. Lighting each step in turn, in the direction somebody is walking, dim enough at night not to wake anyone, is a different job — and it needs one output per step. Here is what that actually takes in wiring terms, and where the behaviour is decided.
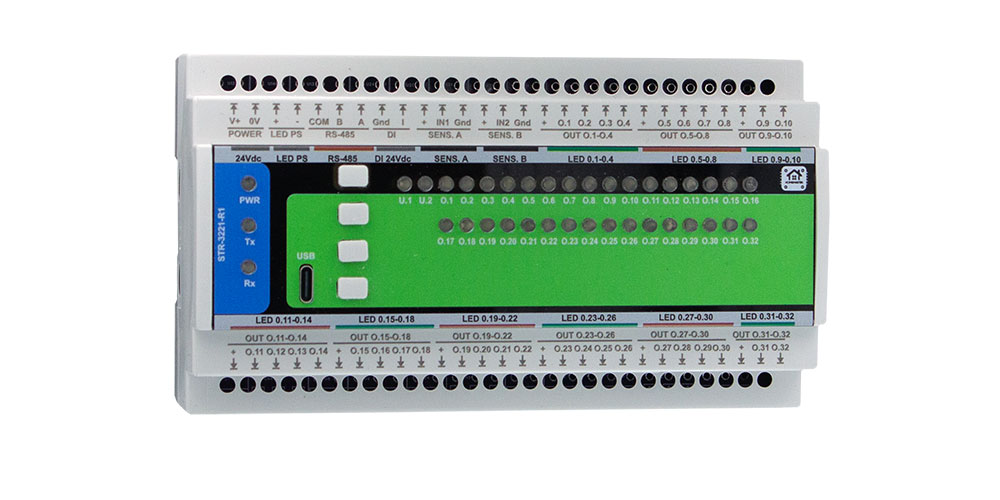
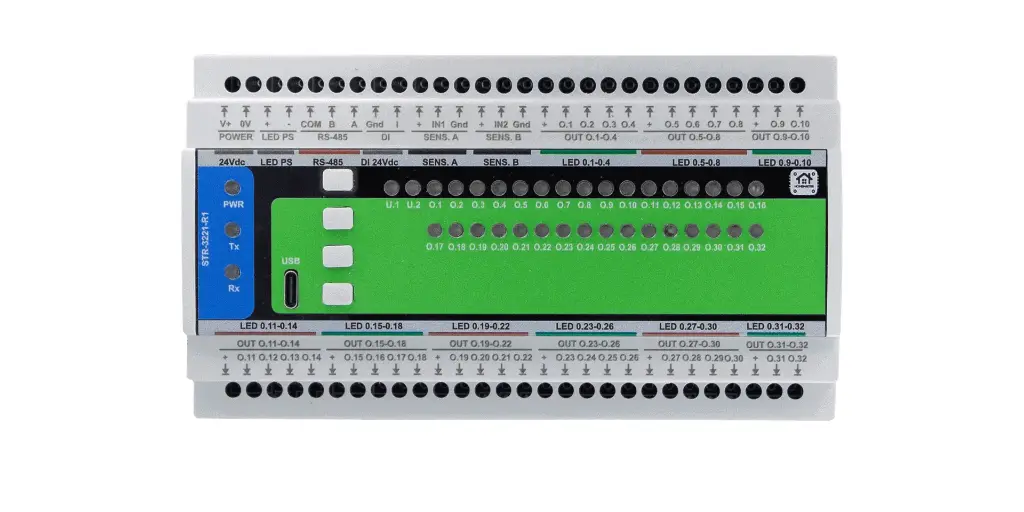
The short version. Per-step stair lighting is a channel-count problem before it is a software problem: one dimmable output per step, two presence sensors so the sweep knows which way to run, and a separate supply for the LED strips because thirty-two channels of tape is not a load you take from the module's own 24 V. The STR-3221-R1 gives you thirty-two low-side outputs, two sensor inputs with their own feed, and a bus connection so Home Assistant can add the clever parts on top.
1. Why Per-Step Is a Different Problem
A light over a staircase is one circuit and one decision: on or off. Per-step lighting is a sequence, and a sequence has properties that a single circuit does not.
It has a direction — the sweep should start at the end you entered from, which means the system has to know which end that was. It has a speed — fast enough to be ahead of the walker, slow enough to look deliberate. It has a brightness that depends on the hour — a level that is pleasant at midnight is invisible at midday. And it has a tail: the steps behind you can fade rather than snapping off.
None of that is expensive in software. All of it is impossible without one controllable output per step, which is the part that has to be decided while the staircase is still being built.
2. Count the Steps Before You Count Anything Else
Thirty-two outputs sounds generous until you count a real house. A single flight between two floors is commonly thirteen to sixteen risers. Two flights with a landing between them is most of thirty. A split staircase, or a flight plus a short run to a mezzanine, and you are over.
So the arithmetic to do first is simply: how many steps, and is that one module or two. The STR-3221-R1 carries thirty-two channels, numbered O.1 to O.32 on the terminal blocks along both edges. If a staircase needs more, it needs a second module and the sequence spans both — which is a controller-level job, not a module-level one.
The other thing to settle early: one strip per step, individually fed back to the panel. That is thirty-two little cable runs converging on one place, and it is the reason this decision belongs to the construction phase. Retro-fitting per-step wiring into a finished staircase is not a lighting job, it is a joinery job.
3. Two Sensors, Because Direction Is the Point
A single motion sensor gives you "somebody is on the stairs". Two give you "somebody has entered at the bottom" and "somebody has entered at the top", which is the difference between a lighting effect and a lighting system.
The module has two dedicated presence inputs, labelled SENS. A and SENS. B on the terminal block, and each comes with its own supply pair — so the sensor is fed from the module rather than needing an adapter at the top of the stairs.
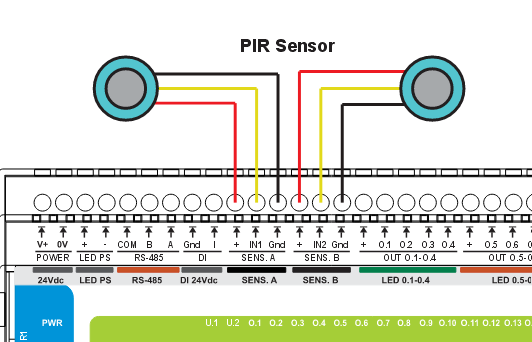
Where to put them matters more than which ones you buy. A sensor aimed along the flight sees somebody who is already climbing; a sensor aimed at the approach sees them a second earlier, which is exactly the second the sweep needs to stay ahead of them. Mounting height and the angle of the lens do more for the result than the sensor's specification.
There is also a general-purpose digital input on the module — a wall switch, a door contact, or anything else that ought to start the sequence — and four buttons on the front, which are mostly useful during commissioning when you want to see channel seventeen light up without walking up the stairs.
4. Two Supplies, and Do Not Confuse Them
This is the wiring detail that catches people, and it is visible on the terminal block: the module has a POWER input at 24 V for its own electronics, and a separate LED PS input for the strips.
That separation is deliberate. Thirty-two channels of LED tape is a real load, and it is a load that varies with how long each step's strip is. Feeding it through the module's own supply would make the electronics' power rail depend on the lighting, which is exactly the coupling you do not want. Instead the strip supply is its own, sized for the tape, and the module only switches it.
The outputs switch the negative side. Each channel is a low-side switch: the positive rail goes to all the strips continuously, and the module makes or breaks the return for each one. Practically, that means the strips share a common positive, each strip has its own return wire back to its own output terminal, and you cannot use these outputs to drive something that expects a switched positive.
Check the current per channel and in total against the module's specification before choosing tape. Two numbers matter and they are different: what one output can carry, and what the whole module can carry with every channel on at once. A short strip per step on a fourteen-step flight is a very different load from a long strip per step on thirty-two.
5. The Practical Problem Nobody Mentions: Voltage Drop
Thirty-two returns converging on one panel means thirty-two cable runs, and the ones from the top of the flight are considerably longer than the ones from the bottom.
With low-voltage LED tape that shows up as a visible brightness difference between the first step and the last, at the same commanded level. The fix is not software — trimming brightness per channel to compensate is a patch that hides a wiring problem and drifts as the tape ages. The fix is conductor cross-section: size the runs for the longest one, not the average, and keep the positive feed to the strips generous.
The same logic applies to the strip supply itself. A supply that sags when all channels come on at once produces a flicker at exactly the moment the whole sweep runs, which is the one moment anybody is looking.
6. Where the Behaviour Is Decided
Two levels, and it is worth being clear about which does what.
On the module. The presence inputs and the channels are wired to the same device, so the basic job — somebody is on the stairs, the stairs are lit — belongs here, and the outputs are driven by the module itself.
On the controller. Everything that makes it feel designed rather than merely automatic: brightness that follows the time of day, a step delay tuned to the flight, a fade tail behind the walker, coordination with the rest of the lighting so the staircase does not come on at full output while the living room is at ten percent, and any sequence that has to span two modules. That logic lives on the MiniPLC or MicroPLC over the RS-485 bus, and it keeps running whether or not the Home Assistant server is up.
Which decisions belong at which level is a subject in its own right — what still works when Home Assistant is down goes through it module by module.
7. Getting It Into Home Assistant
The module sits on the RS-485 bus as a Modbus slave; the controller polls it and bridges to Home Assistant over the ESPHome native API. From there the staircase is just a set of entities, which is where the genuinely nice touches become easy: a night mode that caps brightness after midnight, a guest mode that leaves the flight dimly lit all evening, a holiday setting that ignores presence entirely.
Wiring the bus itself is the usual short list — one pair plus COM, two terminators, unique addresses — and it is covered in RS-485 and Modbus in ESPHome. Note the terminal order on this module: COM, B, A.
8. What This Is Not
Not an emergency lighting system. Escape lighting is a regulated function with its own requirements for autonomy and testing. This is comfort lighting on a staircase, and it should not be presented as a substitute.
Not a mains dimmer. These are low-voltage DC outputs for LED tape. Mains circuits are a different module entirely.
Not a switched positive. Low-side outputs. Anything that needs the positive switched needs something else in between.
Not independent of the strip supply. The module switches the LED load; it does not power it.
RS-485 is not galvanically isolated. Transient protection, which is not the same thing.
9. The Takeaway
The reason per-step stair lighting looks expensive is that people price the module and forget the wiring, and the reason it looks impossible later is that the wiring is the part you cannot add afterwards.
Decide it while the treads are still open: one strip per step, one return per strip back to the panel, a sensor at each end of the flight, and a supply for the tape that is separate from everything else. After that the difference between a staircase that lights up and a staircase that looks designed is entirely configuration — and configuration can be changed on a wet Sunday, which is not true of a cable that was never pulled.
If you are at the stage of planning the whole installation rather than one staircase, the wider piece is connecting dozens of wired sensors, and the System Builder turns a room-by-room list into a module count.